Friday, January 16, 2009

Birthday Pizza

Have I mentioned that my wife makes the world's best pizza crust? Thin crust, with a bit of whole wheat flour in the dough. She made several pies for daughter's 9th birthday. One of my favorites is this one with caramelized onion and blue cheese for the adults. The kids got mozzarella and pepperoni. For vegetables lovers there was the ever-popular broccoli variety. Pizza made at home is so easy there's really no reason to order out for it. We keep a pizza stone on the bottom rack of the oven full-time. Besides crisping the pizza crust, it helps regulate the heat in our old electric oven.

Here's the recipe for the dough.

Thursday, January 15, 2009

What Do Presidents Eat?

There's a great move on to have the Obamas start a large vegetable garden at the White House. But do presidents even like vegetables?

We know that George Bush the elder famously hated broccoli. George Washington apparently loved fish and nuts. Abraham Lincoln was so preoccupied with holding the country together that he paid hardly any attention to what he ate. But he was partial to a good cup of coffee, a simple egg and toast. Harry Truman,befitting his Midwestern roots, favored a big steak, cooked well-done, as well as fried chicken and custard pie.

(Barrack Obama is known to love pizza and chili, and is said to like his vegetables, especially spinach and broccoli. His method of making tuna salad at home includes mustard, mayo, chopped gherkins and juice from the pickle jar. "The truth is, before I met Michelle, I did quite a bit of cooking," Obama told 60 Minutes. But the kids mostly like pasta a cheese toast. "It's not as if we've got real sophisticated palates in this household.")

You can delve into all of these presidential food preferences in endless detail, along with much more about the White House culinary history, from a new web page posted by the Library of Congress. Titled rather dryly, "Presidential Food: Selected Resource Guide," the page lists dozens of written references--White House cookbooks, memoirs and food profiles of individual presidents--along with several internet links. You can even take a video tour of the White House kitchen with Executive Chef Christeta Comerford.

One of my favorite quotes comes from our first president, who, despite the story about his admitting to chopping down the cherry tree, apparently really did like cherries but preferred his food simple.

"My manner of living is plain, and I do not mean to be put out by it," Washington declared. " A glass of wine and a bit on mutton are always welcome. Those who expect more will be disappointed."

What ever happened to mutton? Any chance it will make a comeback under the new administration?

Wednesday, January 14, 2009

Steamed Brown Bread


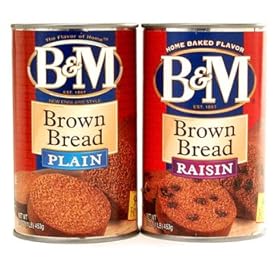
Steamed brown bread, a New England tradition, was a treat for us even growing up in the Midwest. We ate it out of a can (I never knew it any other way) and it was always something exotic and mysterious when it arrived on our dinner plate, almost on a par with getting chow mein carryout from the local Chinese restaurant.

My memory is of the B&M brand of canned brown bread. This is a proud company from Portland, Maine, that first opened for business in 1867 and was canning corn long before it thought to can brown bread or Boston baked beans, the company's most important product. B&M has since been bought up by a succession of bigger food corporations over the years. But the brand and the factory still exist in Portland. The beans, cooked in open pots in brick ovens, come in a can as well as a jar uniquely shaped to look like a classic bean pot.


Making steamed brown bread at home is simple, but the technique may be new to you as it was to me. Instead of baking in an oven, the bread cooks in a pot of boiling water, usually in some sort of tin can or similar mold. (You can even make it in a flower pot). To get the can, I had to buy a pound of coffee at the supermarket. We don't normally get our coffee in a can anymore. Then, after I had mixed the batter, I found that the recipe I was following in Aliza Green's The Bean Bible was much more than enough to fill the 1-pound can she called for. I see now that James Beard, who included an almost identical recipe in Beard on Bread, called for "cans," plural.


An iconic New England food, steamed brown bread typically calls for three types of whole-grain flours, starting with rye flour, corn meal and either whole wheat, graham flour, oat flour or, in my case, since it was what I had in the pantry, barley flour. The batter must contain molasses--a staple ingredient in bygone New England--to give the bread its distinctive color and sweetness. Baking soda and buttermilk react to give the bread its rise. Traditionally, it can be made plain or with raisins.


If you are using coffee cans to make the bread, you'll need to grease the inside or line them with parchment paper. You'll also need a tall pot ( or pots) to steam them in, with a wire rack or empty tuna cans or something similar (I used stainless baking rings) to put at the bottom of the pot so that the bread is not touching the heat source. Since I only had one coffee can, I improvised at the last minute with a small, high-sided cake pan. It worked just as well. Either way, the mold should be covered with a double layer of aluminum foil tied securely with a length of butcher's twine.


To make your bread, mix together 1 cup rye flour, 1 cup cornmeal, 1 cup oat flour (or substitute barley, whole wheat or graham flour), 2 teaspoons baking soda and 1 teaspoons salt. In a separate bowl, mix together 2 cups buttermilk and 3/4 cup molasses.


Pour the buttermilk mixture into the dry ingredients and mix well. Pour the batter into 2 greased, 1-pound coffee cans (I used spray canola oil) or molds lined with parchment paper. Each can should be about 2/3 full. Place the cans into tall pots with a wire rack or empty tuna cans on the bottom. Fill the pots with water to a depth halfway up the side of the bread can (or mold). Bring water to a boil, reduce heat and continue boiling for about 2 1/2 hours, or until a skewer inserted into the bread comes out clean. When the can is cool enough to handle, simply remove the foil, invert the can and tap the bread out onto a cutting board. You may have to use a thin knife initially to separate the bread from the inside of the can.


Note: Aliza Green suggests cooking the bread 2 1/2 to 3 hours. Meanwhile, James Beard calls for cooking the bread 1 1/2 to 2 hours. Quite a difference. We cooked ours for2 1/2 hours and it seemed fine. If two loaves seem like too much, cut the recipe in half and just make one.

My wife thinks the bread gains from sitting a day or two before being eaten. We agree that the only way to serve it is with a generous slather of cream cheese and preferably a bowl of Boston baked beans.

Tuesday, January 13, 2009

How Do You Bake Your Beans?

Boston baked beans and steamed brown bread spread with Philadelphia cream cheese. Isn't this a dinner we all grew up with?

The memory leaped to mind when I went searching for bean recipes yesterday. It's high time The Slow Cook gives more attention to legumes, meaning dried beans of one sort or another. Beans are packed with nutrition, and one of the best sources of calories. No fat, lots of fiber. What more could you ask for? Plus, you can easily grow them in your home garden, even right here in the District of Columbia, about a mile from the White House.

I cracked open my copy of The Bean Bible, by Aliza Green. It's overflowing with excellent background information about beans. Unfortunately, the first three recipes I tried were failures in one way or another. Not by a little. By a lot. Green's recipe for Boston-style baked beans, for instance, took me at least 10 hours to cook. There was simply too much liquid in it. Mea cupla for assuming that a "bean bible" is actually the last word. I have since returned to my library and done some additional research.


Fact or fiction: Beans need to be soaked before cooking.


Some cooks insist on soaking beans to make them more digestible,or simply to reduce the cooking time. I usually soak mine overnight. Green advocates a hot soaking and a pre-cooking process, wherein 1 pound of Great Northern beans are brought to a boil in 8 cups of water and cooked for 2 minutes, then taken off the heat and allowed to soak for 1 hour. The beans are then drained, covered with another 8 cups of water, brought to a boil and simmered for 1 hour. All this before any other ingredients are added. Meanwhile, The New Best Recipe, the kitchen tome put out by Cook's Illustrated, says their numerous trials showed that soaking or pre-cooking is completely unnecessary.


Fact or fiction: Salt added too early to beans will toughen the skin, preventing them from absorbing liquid.


Aliza Green contends that both salt and sugar have the toughening effect. Hence her convoluted process of pre-soaking and pre-cooking her beans. Harold McGee, meanwhile, writing in his seminal On Food and Cooking, says salt does slow the absorption rate somewhat, but that beans pre-soaked in salted water actually cook faster. Furthermore, acids and sugars strengthen the cell walls of beans. Hence molasses--with its classic mix of acid and sugar--is particularly good at helping beans keep their shape during a long cooking process.


Boston baked beans traditionally start with a small white bean (smaller than Great Northern, but that's what I had in my pantry), along with molasses, dark brown sugar, dry mustard and salt pork. These are all classic ingredients that permeate the cuisine of New England. How to finish the beans becomes a matter of taste, and deciding how much of each ingredient to use.


The baked beans I made following Aliza Green's instructions eventually turned out fine--a dense mass of dark beans with a strong molasses flavor. They were much closer to the baked beans I remember from childhood than the beans from a can of Bush's Boston Recipe Baked Beans, which to me tasted like ordinary beans. (But then Bush's Beans hail from Tennessee. What do they know about Boston baked beans?) You can see the difference in this photo--my beans on the right, Bush's beans on the left.


I like the Best Recipe approach, which offers some simple refinements to the classic recipe. For instance, they added diced onion for flavor (Aliza Green calls for placing a whole onion studded with cloves in the bean pot). Also, they suggest cubing the salt pork and browning it before mixing it with the beans. Again, more flavor, compared to the traditional method of simply laying a scored slab of salt pork on top of the beans. They prefer using prepared mustard rather than dry mustard on grounds that most home cooks are more likely to have a jar of prepared mustard on hand. And they like a bit of cider vinegar added to the mix to cut the sweetness of the molasses.


So where does that leave us? I'm not exactly sure, since I liked the end result of Aliza Green's method, but I would gladly incorporate some of the suggestions from Best Recipe. If you pre-cook the beans as described above, proceed by lightly browning 6 ounces salt pork, trimmed of any rind and cut into small cubes, at the bottom of a heavy pot or Dutch oven. Add 1 onion, finely diced, to the pot and cook until the onion is soft, another 8 minutes or so. Remove from heat, skim off excess fat and reserve.


In a large bowl, mix 3/4 cup molasses with 1 1/2 cups dark brown sugar, 1 1/2 tablespoons prepared brown mustard, such as Gulden's, 1 tablespoon ground ginger, 1 teaspoon salt, 1 1/2 teaspoons ground black pepper and 4 cups water.


Pour the prepared beans into the pot with the salt pork and onion. Mix well. Add the molasses mixture,which should easily cover the beans. If not, add more water. Cover the pot and place it in a pre-heated 300 degree oven and cook for about five hours, or until the beans are almost cooked through, adding water to the pot from time to time as needed. Remove the lid, stir the beans, and continue baking until the beans are completely tender and all of the liquid has been absorbed or cooked off. What you should have is a thick muddle of beans, not a sloppy bean soup. If necessary, continue baking with the lid off until any excess liquid is eliminated. Finally, stir in a tablespoon of cider vinegar.


If you do not pre-cook the beans, Best Recipe calls for adding 9 cups of water to the molasses mix and cooking for 4 hours, then removing the lid and baking another 1 hour.


Note: Cooking times for these baked beans are all over the map. I consulted all of my New England cook books, as well as the Fannie Farmer Cookbook (Farmer, a real person, ran the Boston Cooking School for a time around the turn of the 20th Century). Most call for a cooking time of six or seven yours. Be your own judge.

But enough of how I bake my beans. Let's return to the original question: How do you bake yours?

Tomorrow we'll be looking at steamed brown bread. It's hard to beat the stuff out of a can for childhood memories. But if you can't find it at the store, you can make your own.

Sunday, January 11, 2009

Accidental Crab Cakes

The crab fishery has been declared a disaster in the Chesapeake Bay and crab is hardly seasonal this time of year. But most catering clients don't give a lick about sustainability or seasonality. Hence, it's possible to end up with a leftover pound of crab meat in the fridge, probably from someplace in Southeast Asia purchased at Costco.

What to do?

In our case, there was no choice but to invite friends over for my wife's superb crab cakes. I could not think of any way to turn this into a winter menu, we just followed our best instincts and made some of our favorite three-hour braised green beans and the cheese grits we've been focused on this week.

The final menu looked like this

Salad
Tender Greens w/ Honeycrips Apple, Toasted Walnuts, Dried Cranberries
Entree
Crab Cakes w/ Tartar Sauce
Green Beans Braised w/ Tomato and Fennel Seed
Cheese Grits
Dessert
Sweet Potato Pie w/ Vanilla Whipped Cream


Naturally, I received a thorough thrashing from my wife for purchasing green beans in January. Oh, the ignomy of it all. Mea culpa.

The secret to successful crab cakes is to handle the meat as little as possible. In Crisfield, Maryland, for instance, once the world's crab picking capital, a crab cake likely as not will consist of a pile of choice lump meat barely breaded and placed under a broiler to brown. Most cook's ignore this tradition or are completely ignorant of it. That's why so many crabcakes you see in restaurants have the density and resiliency of a hockey puck that has spent too much time in a deep fryer.

My wife's method is to combine 1 pound of lump crab meat with 1/2 cup fresh bread crumbs--that usually means a couple of dinner rolls pulled into small pieces. Combine with 1 beaten egg, 2 teaspoons Dijon mustard, 1/2 teaspoon worcesterhire sauce, a tablespoon chopped parsely, a dash or two of Tabasco and salt and pepper to taste. Gently toss all the ingredients together and let the mixture sit in a bowl for an hour or more. This will help the cakes hold together in the cooking and give the flavors some time to meld.

Next, pour canola oil into a heavy skillet to a depth of about 1/2 inch and heat to medium high. Gently form the crab mixture into 4 jumbo puck shapes, or 5 or 6 large cakes. Place the crab cakes in the hot oil and brown on both sides, turning them gently with a slotted spatula. Remove the cakes to paper towels to drain, then arrange them on a baking sheet and place in a 300 degree oven for about 15 minutes to cook through.

For her tartar sauce, my wife mixes mayonnaise with a bit of finely chopped red onion, some chopped capers, pickle relish, a little juice from the pickle relish jar, and some Old Bay seasoning.

A lot of chefs claim to have secret methods for making crab cakes but this one is better than any other I've seen. The green beans, cooked to death, come to the plate dripping their magical, fennel-scented broth, which runs into the cheese grits to make a delicious muddle. We washed the whole thing down with a wonderful Vouvray wine.

Unless you happen to have a pound of crab meat in your refrigerator already, however, do give the crabs a break and wait until summer to enjoy this meal.

Friday, January 9, 2009

Kids Make Cheese Grits

The movie "My Cousin Vinny" gave us a classic laugh line when actor Joe Pesci, playing a New Jersey lawyer confronting breakfast in the Deep South, asks: "What's a grit?"

There's still some confusion over whether "grits" should be treated in the singular or the plural. But there's no mistaking where grits come from. They are ground corn, familiar as the indigenous grain to early Native Americans who passed them along to the first white settlers. Grits remain a staple of Southern cuisine.

The Indians soaked dried corn in lye, removing the tough shell or pericarp to produce large, soft kernels called "hominy." The large pieces could be ground into tiny grains we now call "grits." But it gets very confusing, because now grits are widely made from untreated corn but still called "hominy grits."

You can still find grits made the old fashioned way--dried corn ground between huge granite wheels. The process results in a fine powder, sold as corn meal, as well as the larger grains, sold as grits. These grits usually take an hour at least to fully cook and are considered by some the only proper kind of grits to serve. Otherwise, the grits sold in supermarkets under the Quaker Oats and other brands have been further processed to cook in as little as 20 or even 5 minutes, in the case of "instant grits." But be warned. Instant grits may taste more like library paste if you are used to the real deal.

Being from Chicago, grits were utterly foreign to me until I moved to the District of Columbia. In my student days, about a century ago, I worked at a federal job that started each morning before the crack of dawn. Our first break was breakfast. I recall musing over the strange mush I saw next to the scrambled eggs on the steam table in the cafeteria. I remember thinking it looked vaguely like cream of wheat. That, I was told, were grits.

Sadly, I never really developed a lasting taste for grits. A pity, because they can be truly delicious if made carefully and slowly in the traditional manner. In the South, grits are a virtual staple, served with ham and smothered in gravy. But grits are not just breakfast food. Shrimp and grits have risen to a fine art, suitable for the finest restaurants, in Charleston. Add eggs and they can become a sublime souffle.

While we are roaming around the South on our virtual world food tour, our "food appreciation" classes sampled old-fashioned grits seasoned with cheese. We used the yellow corn grits sold in bulk at the Whole Foods. Some cultures disdain yellow corn as unfit for humans. They insist on white corn. But I must say I don't detect any difference in taste.

First, soak 1 cup of fresh grits in a large bowl of water. Stir the grits at the bottom of the bowl. This will bring the tough bran from the milling process to the surface of the water where it can be swept away with a strainer. Meanwhile, heat 2 cups of water with 2 cups of milk in a heavy saucepan over moderately low heat. Strain the grits and add these to the pot. Cook very gently for about 1 hour, stirring frequently so that the grits do not stick to the bottom of the pan and burn. Slowly the grits will absorb the liquid, swell and become thicker. Add more milk if desired.

When the grits have reached your desired thickness (not thin and runny, but not thick enough to mound either), remove from the heat and add about 1 cup grated cheddar cheese. We used a yellow Vermont cheddar. Stir until the cheese is fully incorporated, then season with salt as needed. You can also add butter and/or cream if you like. But we thought our grits were perfectly delicious as is.

With our grits, I showed the kids how to cook bacon in the oven. I almost prefer bacon out of the oven to that fried in a skillet. It always comes out flat and pleasing to the eye--not all curly and wild--and it's so much easier to cook a large quantity on a baking sheet than on the stove top. We covered the baking sheet with parchment paper to prevent the bacon sticking. Cleanup is a breeze.

Do you keep a jar of bacon grease? There was a time when I stopped, thinking the pork fat would kill me. But I'm back to saving it, especially from the good Niman Ranch pork we get at Whole Foods.

Thursday, January 1, 2009

Happy Pho Year

New Year's seems to be a time of lists--what's in, what's out. If you put a gun to my head and forced me to make a list of the world's greatest foods, this would have to be near the top--the simple Vietnamese noodle soup called pho (pronounced fuh?, like a question).

You know you are in a great pho house when you walk in the door and are transported by the aroma of star anise. The subtle broth is full of exotic spices and the essence of lots of beef bones, making it pure peasant fare. In its country of origin, pho is street food eaten any time of day, a snack that will keep your belly happy and full until tomorrow. Typically it also contains some beef parts--the less expensive kind you don't see very often in restaurants. Squeamish diners stick to thin slices of shoulder or eye of round, but I like to see mine swimming with bits of tendon and tripe and fatty brisket. On the side you'll be served a plate piled high with bean sprouts, Thai basil, sliced jalapeno and lime to add to the soup as you desire, along with squeeze bottles of sweet Hoisin and scorching Sriracha pepper sauces. We also order a small bowl of pickled onions.

The suburbs outside the District of Columbia have one of the largest Vietnamese populations in the country, so there's no problem finding good pho here. At $7.25 for a large bowl (prices have gone up lately), it's hard to beat for price, which may explain why you see so many non-Vietnamese immigrants lining up for pho. I'm not naming the restaurant where we took our pho yesterday because I had the distinct impression there was less meat in it than customary. Sign of the times? But still, oh so good.