Friday, October 31, 2008

Kids Make Apple Butter

Apple butter is just a hop, skip and jump from applesauce. So if you already know how to make applesauce, you are just a couple of steps from having apple butter.

There's no dairy in apple "butter." But it is thicker and darker than apple sauce--another of the thousand or so uses for apples our forebears came up with when apples were such an important part of the diet.

If you are looking for ways to store from the fall harvest, apple butter is a genius stroke as it can easily be canned and stashed in the pantry.

Use a flavorful, cooking-type apple such as Winesap or Jonathan. We chose Mountaineers from nearby West Virginia and Macintosh. For this recipe, you do not remove the skin of the apple (lending some pectin to help thicken the final product) but you do remove the stems and cores. A couple of helpful pieces of equipment are a food mill, as shown in the picture above, and a splatter screen for covering your cook pot.

To make four pints apple butter:

5 pounds apples, cored and cut into eight wedges each (skin on)

1 cup apple cider

1 1/4 cups granulated sugar

1 1/4 cups brown sugar

1/2 teaspoon cinnamon

1/4 teaspoon ground cloves

1/4 teaspoon nutmeg

Place apples and cider in a heavy pot, cover and bring to a boil over moderately high heat. Reduce heat and simmer until apples are soft, about 10 minutes.

Process the cooked apples finely through a food mill. Pour the apple puree back into the cook pot and mix with sugars and spices. (Note: use 1/4 cup sugar for each cup of puree). Bring to a boil, then reduce heat and continue cooking uncovered, stirring frequently and scraping the bottom of the pot so that the puree does not scorch. Keep in mind that the thick puree, rather than quietly bubbling, tends to burp and burst and send hot material flying into the air. This is where a splatter screen over your pot comes in handy. You don't want a big mess, but you do want the moisture to evaporate so the puree can thicken.

Continue cooking for an hour or more, until the apple puree has thickened and caramelized to a nutty brown. It should mound up in a spoon.

Now you can ladle the hot apple butter into sterile pint jars. Seal the jars and process in a boiling water bath for 10 minutes.

The kids in our "food appreciation" classes had great fun cutting the apples and grinding away at the food mill. Our treat was spreading the finished apple butter on slices sweet potato bread, freshly baked from some of the sweet potatoes recently harvested from our garden. Talk about a tasty snack for fall....

Thursday, October 30, 2008

Lunch

Sweet potato mash with ruby chard.

Preparation time: 5 minutes

Shopping: none

These sweet potatoes were recently harvested from the garden, roasted in a 325-degree oven, then mashed and seasoned with orange juice, maple syrup, cinnamon and nutmeg.

I have enough leftover mashed sweet potatoes to last the week. I am just finishing the last of this chard, also harvested from the garden and braised with garlic and lemon. Both a little on the sweet side, these two go wonderfully well together, especially the red chard juices mixing with the mash.

Wednesday, October 29, 2008

Breaking News: Chesapeake Bay Foundation to Sue EPA


Blue crabs qualify as a "disaster." Oysters have all but disappeared. Each year the Chesapeake Bay spawns gigantic "dead zones" where nothing can live.

The Chesapeake Bay is dying. The entire region continues to use it as a dumping ground for pollution. And for years all we've heard is talk about how something needs to be done, about how something will be done.

It never gets better, only worse.

Finally, the Chesapeake Bay Foundation announced today that it is going to federal court to sue the U.S. Environmental Protection Agency for failing to act to save the Bay. Here's the announcement from Will Baker, president of the foundation:

"For the better part of the last day and a half, I have been talking with reporters. And, just this morning, we formally announced our “notice of intent” to sue the Environmental Protection Agency (EPA) to force the federal agency to keep its promises to reduce pollution and clean up the Bay. Such a notice is required 60 days before actual litigation is filed.

"We are taking this extreme step because not once, not twice, but three times, the EPA has signed agreements to reduce pollution in the Bay. The latest, the Chesapeake 2000 Agreement signed by the states and feds in June of 2000, would have cut nitrogen and phosphorus pollution enough to remove the Bay and tributary rivers from the federal Impaired Waters List. Eight years later, EPA admits they will miss this goal, and they are discussing moving the deadline back another twelve years!

"We’ve had it with these delays. So we are going to federal court. We are targeting EPA as the lead federal agency responsible for upholding the Clean Water Act. And, we are not going it alone. Watermen, recreational anglers, and former elected officials have joined in this action.
Here is a link http://www.cbf.org/site/R?i=kpftxMJw7xp-SvjJLvcnUQ.. to a lot more information about this action. We are going to need your support. Please sign the petition, send the EPA Administrator an e-mail, and sign up for our rally on November 20th in Washington, DC."

If It's Wednesday, It Must Be Yogurt

Tuesday is delivery day for dairy from South Mountain Creamery. My new routine is to open a bottle of whole, cream-top milk (meaning pasteurized but not homogenized) and make a batch of yogurt for the week.

I've done this so many times now that I can almost make yogurt in my sleep. I've found that the secret to creamy, thick yogurt is to add some half-and-half and cook the milk at a fairly high temperature before putting it aside to ferment.

Contrary to what you might think, it's not the number of microbes in the yogurt that makes it thick, but the protein content of the milk. Cooking the milk concentrates the proteins. Many commercial makers add powdered milk to increase the protein content and thicken the yogurt. We'd rather not have industrially altered cholesterol in our yogurt and I don't recommend it for anyone else either. Just be patient, spend a few minutes at the stove and your yogurt will come out luxuriously thick.

My recipe: 3 1/4 cups whole, cream-top milk plus 1/2 cup half-and-half, preferably from grass-fed cows in your local area. Pour the milk mixture into a heavy saucepan and set over fairly low heat, stirring frequently so that the milk doesn't scorch. (If you use gas heat, you might try using a heat diffuser between the flame and the bottom of your pan.) Gently bring the temperature of the milk up to 200 degrees, using an instant-read thermometer to monitor the temperature. Don't be too anxious: this could take 45 minutes or more, but better to not burn the milk or let it boil, in which case it could separate.

Hold the milk at 200 degrees for five minutes, removing the pan from the heat if it gets too hot. Remove the pan from the heat to rest for a minute. Meanwhile, partially fill your kitchen sink with cold water. Place the saucepan in the sink until the temperature of the milk falls back to 120 degrees. Remove the pan.

Mix some of the milk in a small bowl with 2 tablespoons yogurt from a previous batch or with commercial yogurt containing active cultures. Stir this into the saucepan, then pour the milk into a warm quart canning jar. Place the jar in a small cooler with two or three other quart canning jars filled with hot water. Cover and let sit overnight.

By morning, your yogurt will be completely done. Have a bowl with a drizzle of your favorite honey, or perhaps some orange sections and shaved dark chocolate. We will use it all week to make fresh fruit smoothies.

Tuesday, October 28, 2008

Top Blog?


The Culinary School Guide has selected The Slow Cook as one of the 100 top "food blogs for foodies."

We're listed in the "Healthy and Green" category with the following citation:

"Not every entry on this blog is about health food, but it does discourage the eating of fast food and pre-packaged meals. Instead, you’ll find advice on how to cook meals the old fashioned way."

Thanks, Culinary School Guide. We are proud to be old-fashioned. The way the economy is headed, we think the rest of the country might be headed in our direction.

Turn your front yard into a garden, everyone!

Monday, October 27, 2008

Tomato Cleanup Soup

We have so many tomatoes from our recent garden cleanup that we've had to divide them among different bus tubs that are now crowding our kitchen. There's a tub of ripening tomatoes, a tub of green tomatoes (rapidly being made into preserves) and a big bowl of Roma tomatoes destined for pasta sauce and canning.

With one eye on the ripe tomatoes, my wife found this recipe for a smoky tomato soup in the September issue of Food and Wine. The smoky flavor comes from Spanish paprika, or "pimenton de la Vera." She had to travel some miles to the local Balducci's to find it, but it was worth the trip. With generous slices of Gruyere toast on the side, this soup makes a meal. Even our daughter loved it, which is saying quite a lot these days.

1 tablespoon unsalted butter
1 tablespoon extra-virgin olive oil
1 onion, diced small
2 garlic cloves, crushed
2 teaspoons sweet smoked paprika
3 1/2 pounds tomatoes, quartered
1/2 cup water
1 thyme sprig
1 bay leaf
coarse salt and freshly ground black pepper
1/4 cup plus 2 tablespoons heavy cream
eight slices baguette, cut on an angle
2 ounces Gruyere cheese, coarsely grated

Melt butter and olive oil in a heavy soup pot. Add onion and garlic and cook over moderately high heat until tender, about 8 minutes. Add paprika and cook until fragrant, about 1 minute. Add tomatoes, water, thyme and bay leaf. Season with salt and pepper and bring tomato mixture to a boil. Cover, reduce heat and simmer until tomatoes break down, about 15 minutes. Discard thyme sprig and bay leaf.

Puree soup in a blender until smooth. Strain soup back into soup pot, pressing on solids to extract as much liquid as possible. (This may take some time, but don't skimp on the effort as it will result in a luxuriously smooth soup.) Stir in cream and season to taste with salt and pepper.

Meanwhile, heat broiler. Place baguette slices on a baking sheet and broil until lightly toasted on both sides. Top toasts with Gruyere and broil another 30 seconds, or until the cheese is bubbly. Ladle soup into hot bowls and serve with cheese toasts.

Saturday, October 25, 2008

Sweet Success

This was our first year growing sweet potatoes and it was far easier than you might think. We bought seedlings through the mail from an outfit in Tennessee and transplanted them in a small plot in our kitchen garden here in the District of Columbia, about a mile from the White House.

Within a few weeks, the sweet potato plants were sending out long vines with lots of leaves. We discovered the leaves are edible, which proved to be a great addition to our curried-okra stew. The vines started to take over part of the yard (less grass to mow) and began climbing the tomato cages (the tomatoes didn't seem to mind.)

In other words, we did next to nothing to keep these sweet potatoes going beyond a very occasional watering. Finally, it came time to harvest the sweet potatoes. A bulletin from Purdue University indicated that the plants would continue to thrive until the first freeze. But I was pretty sure the tubers must be ready to come out of the ground.

First, I pulled away all the vines. Too much for us to consume, most of them went into the compost pile. Then I began digging for potatoes with my forked spade. There must be a better way to harvest sweet potatoes, because I injured quite a few with the tines of my spade. Slowly I probed around the bed, heaving the soil and revealing our new bounty.

When I was done, we had a small pile of sweet potatoes, maybe 30 pounds worth. The bulletin from Purdue advises "curing" the potatoes for storage by keeping them in a humid environment around 80 degrees for one or two weeks. Since I don't have a humid, 80-degree environment, I spread the sweet potatoes in a bread rack and they now reside temporarily in our foyer.

What to do with 30 pounds of sweet potatoes? That seems to be the question of the hour, something we will be pondering while the potatoes "cure." I have a favorite recipe for a sweet potato salad with pecans and a maple-orange dressing. Beyond that, we don't consume a lot of sweet potatoes--yet.

Perhaps we should start thinking of options for storing them. Perhaps our readers have some suggestions?

Friday, October 24, 2008

Kids Make Apple Crisp

This week we started a culinary world food tour in our "food appreciation" classes and our first stop outside the District of Columbia is the Shenandoah Valley of Virginia where fall means apples. Kids love using a mechanical apple peeler. It used to be every family had one, apples were such an important food. We are using ours to make a simple apple crisp, a traditional dessert that takes only a few minutes to prepare.

First, we peel and core 6 medium apples. We used Golden Delicious. Cut the apples into bit-size pieces, a job made easy by our peeling device, which turns the apple into a spiral while it is coring.


Squeeze the juice from 1 lemon.

Toss the apples with the lemon juice in a pie plate or tin. We used a standard, round Pyrex pie plate.


Meanwhile, mix the "crisp," first whisking together 1/2 cup all-purpose flour, 1/2 cup firmly packed brown sugar, 1 teaspoon ground cinnamon, and 1/2 teaspoon salt. Next, cut 1/4 cup chilled, unsalted butter into the dry ingredients using quick, pinching movements of your fingers to squeeze everything together.


Sprinkle the crisp mixture over the apples, then slide into a 375-degree oven and bake for 35 minutes, or until the crisp is beginning to brown and the apples are starting to bubble.

Serve warm or room temperature. This crisp is delicious as is, the cooked apples all muddled together with the cinnamony topping. But you could also serve it with vanilla ice cream, sour cream or--my favorite--fresh, tangy, homemade yogurt.

Thursday, October 23, 2008

We're In Martha Stewart Living

This month I play a small role in the never-ending effort to "solve" Thanksgiving. In Magazine Land, that would entail the issue of how to prepare a turkey correctly sized for your particular gathering.

I have to admit, this assignment almost stumped me. Of course, Martha had already done all the heavy lifting, coming up with three different turkey recipes alligned with three very different sized gatherings.

There's a dry-brined whole turkey for 14, for instance, then a wee turkey breast roasted with root vegetables to serve six. By far the most elaborate preparation is a boneless turkey breast stuffed with pecans and sausage, rolled in the manner of a French roulade and roasted in cheese cloth. All you have to do is find a butcher to sell you a boneless breast. Oh, right. A butcher.

You'll notice that two of these Thanksgiving solutions involve turkey white meat. Unless its stuffed between two slices of bread with mayo and cranberry sauce, or smothered in gravy or Bechamel sauce, I don't even really like white meat. If you like to spend idle hours drooling over gorgeous food photos, though, this piece is for you.

Otherwise, my best advice for Thanksgiving is to find a local farmer who will sell you a pasture-raised turkey of almost any kind. Cook it any way you like. You are almost guaranteed to have the best turkey you ever tasted.

Wednesday, October 22, 2008

Pickled Turnips

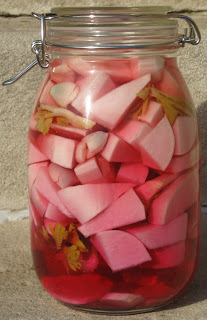
Chiogga beets from our garden give these pickled turnips a pink hue. They're wonderful to look at, sitting in a two-quart jar on our kitchen counter. They're even better to eat.

Making these pickles is a snap. Supposedly they are of Middle Eastern origin. People with Middle Eastern backgrounds have assured me they have tales to tell of pickled turnips. One of those readers has requested the recipe, so here it is, from the Joy of Pickling, by Linda Ziedrich.

2 pounds small turnips, peeled and cut into wedges

tops of 3 celery stalks

4 garlic cloves

1 small red beet, peeled and cut into wedges

2 cups white wine vinegar

2 cups water

3 tablespoons pickling salt (or additive-free sea salt)

Pack all the vegetables into a clean jar. Combine vinegar, water and salt and stir until salt is dissolved. Pour brine over vegetables. Seal jar with a non-reactive cap and let stand a week or 10 days before opening. Pickles will keep at least a month in the refrigerator.

The Great Tomato Cleanup

It is with mixed feelings that I take down our tomato plants. These 13 plants--five different varieties--have been extremely good to us, keeping us in tomatoes every day for months. In fact, they are still making tomatoes, still blossoming, still sending up new growth. But the days grow short and the nights cold. It is time to clear the beds and move on to the next thing.

We compost just about everything around our home here in the District of Columbia. We send very little to the landfill. But I do not compost tomato plants. We live in a perfect climate for various tomato diseases and our plants invariably pick up one sort of wilt or another. I don't want to introduce those diseases to our compost pile. Instead, I take great care to cut the tomato plants into small pieces, bag them and put them out with the trash. I wish it weren't so, but I can't think of another way. One tomato guru even sanitizes his metal tomato cages each season with a blow torch.

I collected another bowl this size with ripe or ripening tomatoes. These green tomatoes--many pounds of them--will make more of our favorite green tomato and apple chutney, perhaps a green tomato jam. There may even be a fried green tomato BLT in our future. These are some of the joys of fall's Great Tomato Cleanup.


Tuesday, October 21, 2008

Pickled Pineapple

A couple dozen erstwhile picklers showed up bright and early Saturday morning for our Powerpoint presentation at the local historical society. By a show of hands, there were a few gardeners present along with a few experienced picklers. But mostly this was a crowd just eager to learn how to pickle.

I was happy to oblige.

Among the questions: "What is pickling salt?"

In my shorthand recipes, I call for pickling salt. Some other kinds of salt will do. Pickling salt it a pure salt with no iodine and no additives. If you look on most salt containers, you will see they contain anti-caking agents and sometimes other additives. Iodine and other additives can wreak havoc withe fermentation. To be on the safe side, I use pickling salt. Sometimes I buy it at the farm supply in Annapolis where my in-laws live. It is also available on-line, or you might get your hardware store to order some. In other recipes it is perfectly safe to use sea salt or kosher salt.

Another question: "What if a recipe calls for 'organic' honey and you can't find it?"

Since honey comes right out of the mouths of bees, I don't know how it could be anything other than organic. I suppose you could make a distinction for honey that derives only from plants raised organically. But I don't know how you could keep the bees from sneaking in pollen from non-organic fields. I say don't worry about it.

Another question: "If sauerkraut is really smelly, would I be better off making kimchi? I don't know how this is going to work in my apartment, unless I do it in the basement."

I let my sauerkraut ferment behind the door to the stairs leading down to our garage. You never notice it--unless, of coarse, you open the door. I fermented our kimchi in buckets in the kitchen. I happen to like the aroma; my 8-year-old daughter doesn't. My conclusion: this is an individual issue.

A comment: "I was traveling once in Poland and had a terrific pickle soup. Ever heard of it?"

In fact, I have. Also sauerkraut makes a great soup--or so I've heard.

The session seemed to be over in an instant. Later, several of the attendees left comments on this blog. By popular demand, I am passing on the recipe for pickled pineapple with cranberries, a "quick" pickle that I would treat as a condiment, something you could definitely pass around with the Thanksgiving turkey.

1 pineapple, peeled and cored and cut into bite-size chunks

1/2 cup pineapple juice

1/3 cup fresh mint leaves

1 teaspoon ground nutmeg

1/2 cup cranberries

1 cup cider vinegar

1/2 cup apple juice

1/4 cup brown sugar

1 cinnamon stick, broken in half

10 whole cloves

In a large mixing bowl, combine pineapple, pineapple juice and mint leaves.

In a non-reactive saucepan over medium heat, combine remaining ingredients and bring to a boil. Stir to dissolve sugar. Reduce heat and simmer for 5 minutes. Remove from heat and allow to cool to room temperature. Discard cinnamon stick and pour liquid over pineapple chunks.

Refrigerate pickles for 24 hours before serving. Refrigerated, they should keep for about three weeks.

Happy pickling everyone.

Saturday, October 18, 2008

A Final Flurry of Pickling

It's been a race to get my Pickling Powerpoint ready for presentation at the local historical society this morning. Lots of pickling and photos of pickles. I think we have enough pickles to last us through the winter. Some of the best pickles are the easiest, such as these Middle Eastern-style pickled turnips with beets. They simply marinate in a big jar with a vinegar brine, taking on a pinkish hue from the beets harvested from our garden. We brought some of these pickled turnips to a recent presidential debate party and everyone fell for them--even those who normally don't like turnips. (Well, they hardly taste like turnips after they've pickled.)

Some non-traditional pickles fall into the category of "quick." These fresh chunks of pineapple are tossed with mint leaves, then submerged in a brine made with cider vinegar, brown sugar, cinnamon and fresh cranberries. They can be eaten almost immediately. Pack them into pint jars and stash in the fridge. They'd be a great condiment for the next pork roast, no?

To demonstrate the classic method of pickling with alcohol, I made these pears preserved in Calvados. I have fond memories of bicycling through Normandy (a lifetime ago, it seems) where everything is made of apples, from the crepes to the cider to the brandy. Calvados is highly refined. Another local branch water--chouchen--is sweet and extremely potent. I'll be saving these sultry looking pears for a special occasion, perhaps a holiday dessert buffet.


These are red onions drenched in a brine of vinegar, chipotle en adobo, garlic, orange zest and mescal. Very easily assembled, this condiment is ready to consume the next day but will keep indefinitely in the refrigerator. I see it in a taco stuffed with pork carnitas, or perhaps on the next barbecue sandwich.


These pickled mushrooms remind me of our wedding, back in the last century. My wife and I made most of the food ourselves--mostly pickles, cheeses and other preserved foods that we were able to start weeks ahead, then present on a grand buffet with a basket of assorted breads. It was just the thing for a backyard October feast.

When you are growing your own food--sometimes more than you can possibly consume--pickling presents itself as a vital option. We had four jalapeno plants that produced an abundance of peppers. I recently pulled the plants to create a new garlic bed and found myself looking at two pints worth of peppers. Preserved in a vinegar brine, they will make a nice condiment for spicy foods.


Finally, I am occasionally reminded that you can pickle almost anything, including meats and seafood. Pickled pig's feet, corned beef, pickled herring and of coarse gravlax, or pickled salmon.

The process in fact is extremely simple if you can get your hands on two or three pounds of salmon. Create a dry mix of coarse salt, sugar and cracked pepper and spread it thickly over a fillet of salmon, along with heaps of chopped dill. Make a sandwich with a second fillet, cover the whole thing with a sheet of aluminum foil and weight it down with a big can of hominy. Place in the refrigerator for three or four days, turning the salmon sandwich a couple of times daily. In the end, you will have delicious gravlax. Cut into thin slices and serve with black bread and your favorite, ice-cold vodka.
We are thinking we need to throw a pickle party. What do you think?

Friday, October 17, 2008

Kids Make Pumpkin Muffins

In my experience, the more ingredients, the better the muffin. That must be what makes these pumpkin muffins so good: two different kinds of flour, two different kinds of sugar, three different spices, buttermilk, ricotta cheese, vanilla.

What's not to like?

Pumpkin muffins proved to be the perfect antidote to all the pickling we've been doing in our food appreciation classes. Assembling these muffins required everyone's attention. Eating them was great fun. This recipe calls for making the muffins in a standard sized muffin tin. But I could easily see using a mini-muffin tin and having these ready as treats for Halloween.


My one reservation about the recipe is the use of granulated and brown sugars. I would love to know how to covert this into another kind of sweeterner, say apple sauce and apple juice, or perhaps even some orange juice. Any tips on conversions would be appreciated.

For a more adult muffin with a little kick, you might add a pinch of cayenne.

To make 12 standard muffins:

1 1/2 cups all-purpose flour

1 cup whole wheat flour

1/2 cup granulated sugar

1/2 cup brown sugar, firmly packed

1/2 teaspoon salt

1 tablespoon baking powder

1 teaspoon baking soda

1 teaspoon each: ground nutmeg, ground cinnamon, ground ginger

1/3 cup buttermilk

1/2 cup milk

2 tablespoons canola oil

1/3 cup ricotta cheese

1 large egg plus 1 egg white

1 tablespoon vanilla extract

1/2 cup plus 2 tablespoons pumpkin puree

Pumpkin seeds


Preheat oven to 375 degrees.


In a large mixing bowl, combine flour, sugars, salt, baking powder, baking soda, spices. Whisk together well.

In a second bowl, whisk together buttermilk, milk, canola oil, ricotta cheese, egg and egg white, vanilla, pumpkin puree. Beat until smooth.

Pour wet ingredients into dry ingredients and gently stir until wet and dry are fully combined. Do not overmix.

Spoon batter in greased muffin tin. Scatter some pumpkin seeds over each muffin and pat lightly into dough. Place in oven and bake until a toothpick inserted into the center of a muffin comes out clean, about 20 minutes. Allow muffins to cool in tin about 10 minutes before removing.

Tuesday, October 14, 2008

Daikon Pickled with Yellow Miso

We Americans are slowly coming to learn that sushi wasn't always about big, expensive cuts of fatty tuna. Sushi started as simple, everyday food and involved lots of pickles.

One of the missions I have set for myself is to learn more about Asian pickles. There's a lifetime worth of discovery awaiting, I expect, filled with all sorts of exotic spices, oils and potions.

This particular Japanese method of pickling daikon radish is extremely simple as long as you have the ingredients handy, including the daikon, yellow miso and standard cheesecloth. Our local Whole Foods carries all three.

Traditionally, the daikon is left out in the sun for a few days until it is limp and somewhat shrunken. I imagine this is to remove some of the moisture from the radish and intensify the flavor. Afterwards, the radish is sliced into 1/2-inch thick pieces, as in the picture above, and pressed between layers of cheesecloth spread with miso.

Miso, a fermented soybean paste, has an intense flavor of its own. Like many fermented foods, miso comes in all kinds of variations with a range of flavors and intensities. Yellow miso is more on the sweet and mild side. In this recipe, it acts almost like a dry brine for the daikon.

1 pound daikon
1 teaspoon salt
1/2 cup yellow miso

Place whole daikon radish in the sun for three or four days, or until it becomes somewhat soft and limp. Cut it into pieces about 2 inches long and 1/2 inch thick.

Toss daikon pieces with salt and place in a colander to drain for 1 or more hours. Spread half the miso on a ceramic dinner plate, cover with a piece of cheesecloth and lay the radish pieces over the cheesecloth in a single layer. Cover with a second piece of cheese cloth and spread the remaining miso over the top. Wrap the plate in plastic and place in the refrigerator for three or four days.

The pickled radish is ready to eat, but can also be stored in the miso for use later.

Monday, October 13, 2008

Roasted Vegetable Lasagna

This is a perfect time of year for roasted vegetables. Making lasagna with them can be quite a process. But there's a payoff in the end: lots of food, either for a crowd or to freeze for later.

This particular lasagna is time consuming but not difficult. All it really takes is a little knife skill to cut eggplant and zucchini into thin slices. These are layered with a mix of roasted red onion and goat cheese, seasoned with one of my favorite herbs, marjoram, which we just happen to have growing in abundance outside our front door.

This recipe will fill a standard Pyrex baking dish, meaning a dozen adult servings. You'll need two pounds of eggplant, two pounds of zucchini, three medium red onions, six ounces of goat cheese, three cups of marinara sauce and lasagna noodles. (I used no-boil noodles from Whole Foods, but don't be shy about making your own.)

Heat the oven to 500 degrees. Trim and peel the eggplant, then slice it lengthwise into 1/4-inch pieces. Salt them generously on both sides and place in a colander to drain for 30 minutes. Squeeze them dry between sheets of paper towel.

Lay the eggplant slices on a baking sheet, brush them on both sides with extra-virgin olive oil and season with pepper. Place them in the oven and cook until they are starting to brown. Slice the zucchini lengthwise into 1/4-inch pieces, brush with olive oil and season with salt and pepper. Roast them also until starting to brown. Peel the onions and cut them into thick rings. Toss them with olive oil and season with salt and pepper. Spread them on a baking sheet and roast as you have the eggplant and zucchini.

When the onions are cool enough to handle, chop them roughly and mix with the goat cheese. Spread some marinara sauce on the bottom of your lasagna pan and cover with lasagna noodles. Layer some eggplant and zucchini over the noodles, dot with the onion-goat cheese mix and pour another layer of marinara sauce. Season with chopped fresh marjoram.

Add more layers until you've run out of ingredients or filled your pan, whichever comes first. Lower the oven to 375 degrees and put in your lasagna--it's a good idea to have a baking sheet underneath to catch any drippings. Bake until the the noodles are completely cooked through and the vegetables are bubbling,l about one hour. Before pulling it from the oven, grate some Pecorino cheese generously over the top and cook a few minutes more.

Serve this with a fresh fall salad and your favorite red wine.

Saturday, October 11, 2008

Swiss Chard with Lemon and Garlic

Swiss chard is such an underrated vegetable, yet it has emerged as one of our favorites. Few vegetables are as constant as chard--always thriving, always ready to give. Chard seems to have hardly any season at all. It grows all year 'round, though it does seem to be especially happy in these cooler months of early autumn. It will survive straight through the winter and be ready for harvesting again first thing in spring.

This is what our chard looks like this morning--bursting with life. I have to admit, we've neglected it. We haven't been eating much chard the last few months, for no particular reason. But the plants don't mind. They just get bigger and sturdier.

I harvested some chard this week, which couldn't be simpler. You just break off the thick stems at the base, or cut them off with a sharp knife. For some reason Americans are fixated on the leafy part of the chard, but I find the stems have more flavor to go with an extra bit of texture. I feel we are at a bit of disadvantage where chard is concerned because we only grow the ruby type, with dark red stems. It has a sweet flavor like its cousin, the beet. The green variety of chard is more savory.

My go-to recipe for chard involves seasoning with pomegranate molasses. But in the interest of diversity, I wanted to try something different. So here's another method of cooking chard that's less sweet but does just as good job of showing off everything chard has to offer, which includes lots of good nutrition.

Take several large stalks of chard and wash them well. Tear off the leaves and cut the stems into bite-size pieces. Over moderate heat, pour some extra-virgin olive oil into the bottom of a heavy pot or Dutch oven. Add the chard stems, season generously with coarse salt and add a couple tablespoons of water. Cover the pot and let the stems cook.

Meanwhile, chop a few garlic cloves and add those to the pot. Chop the zest from 1/2 lemon, add that and the juice from the lemon to the pot.

Roll the chard leaves into a tight cigar shape and cut them cross-wise into a thick chiffonade. Drop these into the pot--they should be a bit damp from the washing. They may make a big pile in your pot, but not to worry. They cook down quickly.

Reduce heat and continue cooking gently until the stems are very tender, about 30 minutes. The chard leaves will have completely wilted. Adjust salt and season with freshly ground black pepper. Serve hot as a side dish with your favorite roast, or over rice as a simple meal.

Chard can be cooked like this ahead of time and frozen, or stored in the refrigerator for use another day.

Friday, October 10, 2008

Kids Pickle Pumpkins

With Halloween just around the corner, we are thinking about pumpkins and especially how to make this iconic squash edible. Among the pumpkins on display at the local Whole Foods are these fun, kid-sized versions. They're perfect for my "food appreciation" classes, where this week we continued our pickling theme with--what else?--pickled pumpkin.

Usually we think of pumpkins as decoration. But anyone who's ever tasted pumpkin pie or pumpkin soup knows they make great food as well. In that regard, they are very similar to butternut squash. The meat is a bit less orange than the butternut, the flavor not quite as intense. But both squashes lend themselves to the same sort of treatments, with the same range of spices.

Once you get the pumpkin ready--meaning removing the tough skin and the squishy, seed-filled interior--this pickling process is very simple. Look for a pumpkin weighing about four pounds.

I like to use a large, serrated bread knife to skin the pumpkin. First cut away the stem end, then set pumpkin securely on a cutting board. Cut away the skin in long strips from top to bottom. Turn the pumpkin as you work your way around it. Once the skin is removed, cut the pumpkin in half, scrape out the interior (you can roast the seeds for snacking later) then slice the halves into crescent shapes about 3/4-inch thick. These can then be cut easily into bite-size pieces.

To make 6 pints:

3 1/2 pounds bite-size pumpkin pieces

2 tablespoons pickling salt (or additive-free sea salt)

1 teaspoon whole cloves

1 teaspoon black peppercorns, crushed

3 bay leaves, broken into pieces

6 cups cider vinegar

3 cups sugar

1 2-inch piece ginger, cut into slivers

9 garlic cloves, peeled and roughly chopped


In a large mixing bowl, toss pumpkin pieces with salt. Transfer to a colander. Set the colander inside the bowl and allow to drain overnight. After removing the pumpkin liquid, transfer pumpkin pieces back into the bowl and cover with water. Using the colander, wash and drain the pumpkin pieces two or three times. Set aside.

Meanwhile, place the cloves, peppercorns and bay leaves in a spice ball or tie into a small sachet with cheesecloth. Place vinegar, sugar, spice ball, ginger and garlic in a saucepan and bring to a boil, stirring to dissolve sugar. Reduce heat and cook, covered, for 10 minutes.

Pack pumpkin pieces into hot pint canning jars. Ladle hot brine into jars, leaving 1/4 inch headspace. Screw lids onto jars and process 10 minutes in a boiling water bath.

Allow the pickles to mellow several weeks in a cool, dark place before opening. Make them now, and open some for Halloween.

Thursday, October 9, 2008

We're In Edible Chesapeake!

On the right-hand side of this page, you'll see a picture of a man in a strange plastic suit using a machine to pluck a turkey. That's our farmer friend Mike Klein. I've lost count of how many times I've visited his small truck farm in Brandywine, Maryland, shortly before Thanksgiving to help him round up and butcher his flock of turkeys.

My first year as a volunteer, Mike had around 80 turkeys and he'd ordered the chicks especially early in the season. That gave the birds a few extra weeks to grow. My reward for helping that weekend was a 42-pound bird that just barely fit into our oven and earned me a permanent Thanksgiving black mark where my spouse is concerned.

Butchering turkeys puts you in close contact with the food destined for your table. We chase them down inside their pen, then hang them up and slit their throats so they can bleed out. They get a brief dunk in scalding water, then a turn on the plucking machine before we gut them, chill them down and package them for transport to Mike's customer's.

I wrote up the experience for this fall issue of Edible Chesapeake magazine, now on news stands. Next to my piece is one by editor Renee Catacalos about taste-testing heritage turkey breeds. Unlike Renee, apparently, I like gamey flavors. That 42-pound bird--a broad-breasted bronze--was one of the best I've ever eaten.

People have come up with all kinds of ingenious methods for cooking turkeys and testing for doneness. But here's a curious factoid: no matter what size the bird (unstuffed), they all take 3 1/2 hours to cook. I'm not sure why that is, but that's my experience. Maybe it's because our turkeys are always bigger than 20 pounds. Just another of those kitchen mysteries we'll probably never solve.

Wednesday, October 8, 2008

Indian Pickled Cauliflower

Part of my upcoming Powerpoint presentation on pickling at the local historical society focuses on international pickles. People are fairly familiar with things like Korean kimchi and French cornichon by now but I don't think our appreciation of pickles from other countries is nearly wide or deep enough.

Pickling has been practiced in Asia for thousands of years. The Indians love their pickles and you can count on them to devise recipes with the usual mixes of exotic spices. I found this one in The Art of Indian Vegetarian Cooking, by Yamuna Devi. These pickles use a somewhat different process, being tossed with roasted cumin, salt and turmeric, then covered with mustard oil and left out in the sun for two weeks to cure.

I know--the sun is a bit low in the sky these days to be making sun pickles. But I was anxious to try them. I'm sure they'll work great as a condiment with our next curry dinner.

To make 1 quart:

1 1/2 quarts water

florets from 1 small head cauliflower (about 16 ounces)

3-inch piece ginger, peeled and thinly sliced

2 tablespoons dry-roasted cumin seeds

2 teaspoons pickling salt (or additive-free sea salt)

1 teaspoon turmeric

pinch cayenne

1 1/2 cups mustard oil (or substitute sesame oil)


Cut cauliflower florets into bite-size pieces. Bring water to a boil in a heavy pot. Add ginger and cauliflower and blanch for one minute. Drain, then spread ginger and cauliflower on a baking sheet covered with a tea towel. Set aside in a warm spot for one hour to dry.

Mix cumin, salt, turmeric and cayenne. In a large mixing bowl, toss spices with ginger and cauliflower. Pack cauliflower into a sterilized quart jar.

In a small saucepan over moderate heat, heat mustard oil to smoking point. (If using sesame oil, it only needs to heated.) Cook oil for 4 minutes then pour it over the cauliflower. Secure a non-metallic led on the jar (a paper towel with a rubber band with do.)

Set the jar in the sun for 14 days, bringing it indoors every night. Give the jar a shake at least every day. Refrigerate the pickles after opening.

Note: Mustard oil can be found in Indian groceries. To dry-roast cumin seeds, I simply toss them in a small, cast-iron skillet over moderate heat. Be careful not to burn them. They are done when they become very aromatic.

Sunday, October 5, 2008

Goodbye, Old Fried

Sometimes it's hard to let go. This hat had served me well. It kept the sun off my face and marked me as a gardener. It became part of my identity. I wore the hat until it was in tatters. Finally, it was time to say goodbye to one straw hat that had served its purpose well. It goes into the compost heap to serve another day.

Saturday, October 4, 2008

Kids Make Pickled Green Tomatoes

Our tomato plants here in the District of Columbia are still producing as we head into October. In fact, some of our plants are loaded with green tomatoes. It's an excellent time to be making things like sweet pickled green tomatoes and our famous green tomato and apple chutney. Once we've put these in canning jars and processed them, they'll keep for a year at least.


The process for pickling green tomatoes is a bit long to finish in one session with the kids in my "food appreciation" classes. So what we did was study the recipe, cut up some tomatoes, and set them to soaking in a lime solution to maintain the green tomato crunch.


These are good lessons to teach science and math. Lime, for instance, is something most kids (or most adults, for that matter) have never heard of. It calls for a bit of explanation of the pH scale, where lime falls on the "base" or alkaline end. Using lime is a bit old-fashioned, but I can attest to its ability maintain crispness. Culinary lime is not so easy to find in the city. I get mine at a farm supply in Annapolis that has lots of canning equipment. You can also find it on-line. But since canned foods like to be acid, it's very important to rinse all the lime out of the tomatoes before cooking them.


The kids used their plastic knives to cut the tomatoes into wedges. Then we mixed our lime solution and poured it over the tomatoes. They soak 24 hours before being cooked with onions, vinegar, sugar and lots of spices. This particular recipe results in one of our all-time favorite pickles. It will easily make six pints.


4 pounds completely green tomatoes (do not use any that are showing even the slightest hint of ripening)

4 quarts water

1 cup pickling lime

1 1/2 pounds onion

5 cups cider vinegar

5 cups sugar

1/4 cup pickling or other non-iodized salt

3 tablespoons mustard seed

3 teaspoons celery seed

2 teaspoons whole peppercorns

2 teaspoons whole allspice

1 teaspoon turmeric

1/2 teaspoon ground cinnamon

1/4 teaspoon ground cloves


Cut the tomatoes into moderately thin wedges and place in a large, non-reactive bowl (do not use aluminum, for instance). Mix the pickling lime and water and pour this over the tomatoes. Stir gently to coat all of the tomatoes with lime solution. Cover and let the tomatoes soak 24 hours, stirring occasionally to mix up the lime.


Following the soaking period, use a colander to rinse the tomatoes thoroughly in cold water three or four times to remove all the lime. Some of the tomato seeds with rinse out and collect in the sink. Again, do not be concerned. Peel the onions and cut them into thin strips, a bit thinner than the tomatoes.


Combine the vinegar, sugar, salt, mustard seed, celery seed, peppercorns, allspice, turmeric, cinnamon and cloves in a processing pan or large heavy pot. Bring mixture to a boil and cook, uncovered for two minutes. Add the tomatoes and onions, bring to a boil again and continue cooking over moderate heat, pushing the vegetables down under the surface occasionally, until the tomatoes begin to look translucent, about 15 minutes. Be careful not to overcook them.


Ladle the hot pickles into clean, hot, pint-sized canning jars leaving 1/4 inch of headspace and dividing the spices among the jars (there will be lots of leftover mustard seeds). Use a dowel or the thin handle of a wooden spoon to remove any air bubbles that may be lurking among the pickles. Seal the canning jars with two-piece lids according to the manufacturer's instructions and process for 10 minutes in a boiling water bath (I use a pasta pot with built-in strainer for this, but there are special canning devices made especially for this purpose).


Allow the jars to cool, then label them. Let the pickles mellow for a month before consuming.

Friday, October 3, 2008

The Presidential Raffle


Sarah Palin is determined to bring a cartoon character to the White House, dag blammit. Or is it Joe Six-Pack we're supposed to elect? I get confused. But gosh darn it, why can't we just have some ordinary person leading the country--somebody just as dim as you or I?

After reading every scrap of media that was put before me this morning, I pondered Palin's proposal and--wouldncha know it?--I experienced some kind of epiphany. Of course, and golly gee! We don't really need an election at all. We could save all that money--all those months of campaigning and mind-numbing television ads--as well as a whole lot of personal anxiety by just holding a presidential raffle.

Gee willickers, we've already got all the infrastructure in place (wink, wrinkle nose). We could just drop everyone's Social Security number into a hat and pick two winners, one for president, one for vice-president.

Now, that wouldn't guarantee we put someone perfectly average in the White House (gosh, it'd be hard to top the current occupant, wouldn't it?). There's always a chance we might pick a Harvard-educated lawyer or constitutional scholar or--perish the thought--community organizer. But at least this way, everyone would have a fair shake. In fact, I betcha our chances of getting a truly average president would be better than average.

Holy cow! I say go fer it.

Thursday, October 2, 2008

Lunch

Leftover lamb shoulder chop with Romesco sauce, bulgar with lemon and black olives, smothered okra with corn and diced tomatoes.

Preparation time: 5 minutes

Shopping: none

We do love our leftovers, although this does sound like an add combo at first blush--a sort of Mediterranean-Caribbean fusion. In fact, it all went down quite nicely. The okra, of course, is from the garden. The season will soon be over for them, but we couldn't have asked for more from our sturdy band of okra plants. We've stewed them, curried them and pickled them and still they keep coming. What a great vegetable.

Wednesday, October 1, 2008

Pickling Marathon

I will be giving a Powerpoint presentation on "Pickling for Dinner" later this month at the Historical Society of Washington, DC. That means getting very busy pickling just about everything in the garden and taking photos. Our Asian eggplants are heavy with fruit...
For our wedding reception about a century ago, my wife and I presented an October buffet with tons of pickled and preserved items. One of them was eggplant thinly sliced and preserved with layers of garlic, red pepper flakes, basil leaves, red wine vinegar and olive oil. Normally, my wife's not a big fan of eggplant. But she makes an exception for this.

It's high time we planted our own fig trees. They do fairly well in our climate. Figs were on sale at Whole Foods so I brought home a couple of pints to make these delicious pickled figs with strong flavors or cinnamon, cloves and allspice.


These tarragon "flame grapes" could hardly be simpler. After being loaded in pint jars with sprigs of tarragon, they're covered with a sweet-and-sour brine of white wine vinegar and sugar, then allowed to sit several weeks until the brine has permeated the grapes.


I finally found an alternate use for those giant squash on my Italian zucchini plants: zucchini bread-and-butter pickles. The process is very similar to the one used to make simple bread-and-butter pickles from cucumbers. The resulting pickles are equally as delicious. Next stop: zucchini relish.