Showing posts with label beets. Show all posts

Monday, April 9, 2012

Kids Make Borscht


It's not all about beets

By Ed Bruske

aka The Slow Cook

Could borscht be the best soup ever?

My earliest memories are of a restaurant version somewhere: treacly sweet and garishly red. No thank you. The soup we made in our food appreciation classes last week, in contrast, groaned with all sorts of vegetables and a depth of flavor that only hinted at beets.

I'm convinced that the borscht we're most familiar with--that shockingly red beet puree--sprang from the imagination of a restaurant chef. I found nothing of the sort in my primary source--Please to the Table--an award-winning collection of recipes and food lore from the former Soviet Union. In fact, the author's first version of borscht--a traditional Ukranian soup--starts with pork or ham.

We made the vegetarian version (except for the chicken stock). Sure, it was red. But it was also so much more. The kids were crazy for it, asking for second and third helpings. How many other ways do you know to get children to salivate over cabbage, carrots, green pepper, celery, tomatoes--and, yes, beets.

Normally my recipes describe ingredients as part of the narrative. But there are so many in this soup, I will list them first. In fact, the most difficult part of this soup may be shopping for the ingredients. Maybe the best plan is to make a large batch and freeze some for later.

You'll need the following:

6 Tbs butter

1 large onion, finely chopped

1 large carrot, peeled and grated

1/2 large green pepper, cored and cut into small dice

1/2 small cabbage, shredded then coarsely chopped

1 medium beet, peeled and grated

1 rib celery, cut into small dice

1/2 tart apple (such as Granny Smith), peeled and cut into small dice

2 medium boiling potatoes, peeled and cut into small dice

4 cloves garlic, minced

1 6-ounce can tomato paste

2 quarts chicken stock

bouquet garni, consisting of 1 bay leaf and 8 pepper corns tied in cheesecloth

1 tsp sweet paprika

salt and pepper to taste

1/2 tsp sugar or more to taste

juice from 1/2 lemon

chopped fresh dill for garnish

sour cream

Melt the butter in a heavy soup pot over moderately high heat and add the onion, carrot and green pepper. Cook until the onion is soft, about 5 minutes, then add the cabbage, beet and celery. Cook a few minutes more, stirring frequently, then add the apple, potatoes and garlic. Stir in the tomato paste and mix well, then add the chicken stock and the bouquet garni.

Bring the pot to a boil, then lower the heat and cook 25 minutes, or until the vegetables are cooked through and the soup is quite aromatic. Remove the bouquet garni and stir in the paprika, salt, pepper, sugar and lemon juice.

Ladle the soup into large bowls (this soup does not need to be piping hot) and garnish with chopped dill. Serve with a sour cream on the side. Kids are not wildly enthusiastic about sour cream. But what do they know. In my opinion, borscht is best with a big dollop of sour cream in it.

Saturday, February 14, 2009

February Harvest

Carrots have stored very nicely in the ground. And since we've been experiencing a bit of a thaw the last week I went out and started preparing beds for planting. While I was digging around, I pulled up this lovely bunch, about five pounds worth.

We've been pulling occasional parsnips through the winter. These were planted last spring and were starting to show new growth on top. Time to pull them before they get too tough to eat.

Lots of beets as well. Some will go into our favorite beet salad with red onion and red wine vinegar. The rest we'll try to store. But not to worry. No chance they'll go bad. We love beets too much.

Wednesday, October 22, 2008

Pickled Turnips

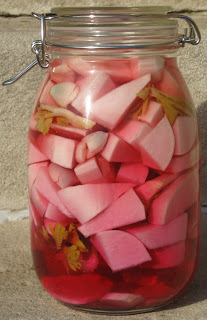
Chiogga beets from our garden give these pickled turnips a pink hue. They're wonderful to look at, sitting in a two-quart jar on our kitchen counter. They're even better to eat.

Making these pickles is a snap. Supposedly they are of Middle Eastern origin. People with Middle Eastern backgrounds have assured me they have tales to tell of pickled turnips. One of those readers has requested the recipe, so here it is, from the Joy of Pickling, by Linda Ziedrich.

2 pounds small turnips, peeled and cut into wedges

tops of 3 celery stalks

4 garlic cloves

1 small red beet, peeled and cut into wedges

2 cups white wine vinegar

2 cups water

3 tablespoons pickling salt (or additive-free sea salt)

Pack all the vegetables into a clean jar. Combine vinegar, water and salt and stir until salt is dissolved. Pour brine over vegetables. Seal jar with a non-reactive cap and let stand a week or 10 days before opening. Pickles will keep at least a month in the refrigerator.

Tuesday, July 22, 2008

Lunch

Plate of leftover salads: beet and tomatoes, corn salad.

Preparation time: 5 minutes

Shopping: none

We never tire of having a container of our beet salad in the refrigerator. Fresh beets from the garden, tomatoes and red onion seasoned with extra-virgin olive oil and red wine vinegar is big on flavor and utterly refreshing, especially chilled. Next to that is a simple corn salad with many of the same ingredients, plus cilantro. I could easily add to that some of the jalapeno growing in the garden. We've had some in fresh salsa and the flavor is explosive--so fruity and aromatic, and no salmonella.

Friday, July 18, 2008

Lunch

Fried eggs with sauteed beet greens.

Preparation time: 15 minutes

Shopping: none

I can hardly think of a vegetable easier or more delectable then freshly harvested beet greens. I'd been eyeing one particular Franken-beet in our garden. It was unexpectedly huge, some kind of mutant, with greens towering over the rest of its mates. I was weeding in the area this morning and decided it was time to see what this fellow was all about. I pulled it up, and it looked like a giant, red parsnip. No accounting for a beet like that. But nothing goes to waste around the garden. If it's edible, it will be eaten.

I brought the greens inside, let them soak in the kitchen sink to refresh, then sauteed the leaves very simply in the cast iron skillet with extra-virgin olive oil, coarse salt and just the water left on the leaves after lifting them out of the sink. You could season the greens with a little white wine vinegar, or even cider vinegar.

Meanwhile, I melted a spoonful of butter from South Mountain Creamery in the non-stick skillet and fried a couple of eggs from our farmer friend Brett. (These would be the ones that require the five-mile drive to the Chevy Chase farmers market). Dust the eggs and greens with some grated Pecorino cheese. I dabbed some red Sriracha pepper sauce on there as well.

I'll be tasting this for the rest of the afternoon...

Wednesday, July 16, 2008

First Beet

A friend came over to talk about teaching food to kids and just to make an impression on the virtues of root vegetables I went out to the garden to see if I couldn't find a beet ready to harvest.


Well, the beets are farther along than I thought. I pulled up a beauty--big and heavy and perfectly formed. I didn't put it on the scale, but I'm guessing it weighed close to a pound.


I couldn't think of a better end for it than our favorite beet, tomato and red onion salad. Prepare your beets in the usual way. Give it a good cleaning. Remove the stems. (I sauteed the greens for a snack. They are delicious.) Either roast the beets slowly in the oven, or cook them in a pot of water. I use a metal trussing skewer to test for doneness. When the skewer pierces the beet easily, it's done.


Set the cooked beets aside to cool. At that point, the skin should slide off very easily. Depending on the size, I usually cut the beets into bite-size wedges. Mix in a bowl with ripe tomato, also cut into wedges, and red onion cut into thin strips. I used our own puny red onions from the garden for this. Add a green herb. I like chives for this, but I think mint or even anise hyssop would work as well. Then toss with some extra-virgin olive oil and red wine vinegar. I also like the idea of a different red-fruited vinegar, such as raspberry vinegar.


Season with coarse salt and freshly ground black pepper.


Our beet salad made an easy, cool summer dinner paired with a leftover corn salad from the fridge. When vegetables are this fresh, there's no reason to eat anything else.

Friday, March 21, 2008

Dark Days: Beet Salad with Arugula and Pickled Red Onion

Our recent beet harvest yielded about seven pounds, but since these beets were first planted last August I was anxious to see if they were actually edible.

The beet greens, braised with garlic, shallots and red wine, yielded a delicious lunch earlier in the week. I cooked the beets yesterday in batches in a large pot of water, leaving the root and some of the stem intact.

From the boiling water they went directly into a cold water bath. The skins slipped off easily. I cut the beets into wedges. Now to taste.

The verdict? Not bad. A wee bit chewier than you would normally hope, but sweet and quite edible, especially for beets that had been in the ground for seven months. We are learning lots lately about how things overwinter in our kitchen garden here in the District of Columbia.

We decided these beets would be good candidates for pickling, but I put a few aside for dinner. I made quick pickles of some red onions. (See below). I tossed the beets and pickled onions with overwintered arugula from the garden and some blue goat's milk cheese, then dressed everything with a simple honey-mustard vinaigrette.

Now that spring is here, the arugula is desperate to go to seed. The seed stems seem to rise overnight. But that's fine with us. Along with the peppery leaves, the buds and flowers are great for spicing up a salad.

To pickle a batch of red onions, peel and cut two red onions in half lengthwise, then slice the halves into thin crescents. Put these in a bowl and cover with four cups of boiling water. Let stand 5 to 10 minutes, then drain in a colander.

In the same bowl, mix together a marinade of 1/2 cup cider vinegar, 1/2 cup water, two tablespoons honey, 1 teaspoon black peppercorns and 1 teaspoon whole cloves. Return the onions to the bowl, mix and let stand for about 4 hours, tossing the onions in the marinade occasionally.

The onions are best chilled before using. Or pack them into 2 pint-sized canning jars with the marinade and store in the refrigerator.

Tuesday, March 18, 2008

Lunch: Braised Beet Greens with Red Wine and Sectioned Oranges

We don't make beet greens often because there just aren't enough of them on the typical bunch of beets you buy in the store or at the farmers market.

But this morning I cleared out a whole bed of beets that had been planted last August. (Yes, you heard right--last August.) My haul was quite a load of big, healthy beets, as well as a bin full of greens. I separated the greens from the beets, then filled the kitchen sink with cold water, where the greens got a good soak and a wash. While the greens refreshed, I sorted through them, saving the majority (with stems) and tossing the wilted and damaged ones into the compost container.

I had an idea to braise these greens and literally was casting about the kitchen, looking for things to add to the pot. There were some garlic cloves, some shallots, a partial bottle of red wine and an orange sitting on the countertop. That all sounded good to me, so I fired up my big cast-iron skillet.

In the end, I had about 1 1/2 gallons of greens, so this formula is for a big mess of beet greens. Adjust according to the quantity you have on hand.

In a large skillet, heat a tablespoon or two of extra-virgin olive oil and saute over low heat 3 shallots, peeled and cut into thin rings, and 3 cloves garlic, smashed and roughly chopped. When the shallot begins to soften, start adding the cleaned beet greens. They will be dripping water, which is fine for the braising. After filling the skillet with a 1-inch layer, drizzle some olive oil over the greens and season with a pinch of coarse salt. Turn up the heat to moderate and continue layering the beet greens with olive oil and salt until they are all in the skillet. It will make quite a mound, but will soon cook down.

As the greens cooks, turn them occasionally with your spring-loaded tongs and lower the heat so they just simmer. When the water has evaporated, after about 15 minutes, pour about 1/3 cup red wine over the greens and continue braising. If the skillet runs dry before the greens are perfectly tender, add some more wine. Season with black pepper.

Meanwhile, section two oranges over a bowl, removing the rind and pith but saving the juices. By now the pile of greens will be vastly reduced, enough to serve four to six people as a side dish. Pile the greens onto plates and garnish with orange sections and a drizzle of orange juice.

Fresh beet greens have a hearty, intensely satisfying meaty flavor that is barely reminiscent of beets. There's not much else in the world of greens that can touch them. If you were eating them as a side dish, they'd go perfectly with roast pork. Even better, a gamey piece of venison.

Saturday, March 8, 2008

Spring Cleanup Soup

Among my many sins, I have been neglecting for months a small patch of beets in one of my garden beds. It just so happens that this bed parallels the alley from our driveway to the front door, so that I frequently pass by these beets and remind myself that I should be doing something with them.

To put an exclamation point on my guilty feelings, I looked back in my garden journal and saw that I originally planted these beets on August 4 of last year. Could they possibly be seven months old? Granted, this is an area that receives only morning sun and the winter sun is not much. But most of the plants had never advanced beyond the wee juvenile stage. They were still leafy and obviously alive, however, sagging when things got too cold, perking up again as the weather improved. They just seemed to be in some sort of state of arrested development.

Well, yesterday we started our spring cleanup and planting. The beds where the beets were located is destined for other things. I lifted the beets out of the ground with my forked spade and began sifting through them. Curiously, some of the beets were still mere seedlings. (So what have they been doing all this time?) None were what you would call "mature." But several were big enough to bother cooking, and after tasting a sample, I determined that all the greens were indeed edible.

This sounded like the component of a meal--what, exactly, I wasn't sure. Then I remembered not one but two containers of homemade chicken stock in the fridge that absolutely needed to be consumed. A quick check of the pantry revealed a one-pound bag of small red beans that have been sitting around doing nothing forever. A small bag of brown rice was perched on top of a canister, looking for a permanent home. The glimmerings of a soup began to appear.

Start with 1 red onion that is beginning to sprout on your kitchen counter. Remove the green center where it is growing and cut the rest into medium dice. Dice another leftover 1/2 onion from the crisper drawer, plus three medium carrots. Start cooking the onion and carrot in about 3 tablespoons extra-virgin olive oil at the bottom of a large, heavy pot or Dutch oven set over moderately-low heat. Season with 1 teaspoon coarse salt to bring out the juices. Next add three cloves garlic, crushed and chopped fine.

When the onions are soft, stir in about 12 cups homemade chicken stock. Add 1 pound small red beans and two or three sprigs fresh thyme. Raise heat, bringing the soup to a boil, then reduce the heat to low and simmer until the beans are cooked through. This will probably take three or four hours. Now stir in 1 cup brown rice and cook until the rice is tender, about 45 minutes. Remove the thyme sprigs and add 1 can of diced tomatoes, drained, and about 1 gallon of beet greens, cleaned and coarsely chopped. (This would also be an appropriate time for other winter greens you might have, such as kale or collards, but I might have cooked them separately before adding to the soup.) Season to taste with salt and freshly groud black pepper.

Our soup turned out pretty thick. You can always thin it with more chicken stock or water if you like. In the picture above, a scoop of queso fresco, or fresh cheese from the Latin market, completes the ensemble. You could also use finely grated cheddar or jack or another or your favorite cheeses. What sits before you now is a complete protein, you don't really need anything else, except perhaps a nice glass of red wine.

You should have enough soup to freeze several servings, in addition to filling an 8-cup container that will make breakfast for the foreseeable future. And if you are wondering what happened to all the beets--I cleaned them and peeled them and roasted them. I went out to run an errand and let them cook a bit too long, but they were still perfectly edible. Which begs the question: How long can you leave a beet in the ground and still eat it?

Wednesday, September 26, 2007

Beet, Red Onion & Tomato Salad

This is one of our favorite summer salads, all the better with beets and tomatoes freshly harvested from the garden.

The beets are the Chiogga variety, noteworthy for their concentric circles of red and gold when sliced open. We cook the beets in boiling water until just done, then move them to a cold water bath to arrest the cooking process. The tops and tails and the skin are all easily removed at that point. You can slice the beets into wedges, or very casually, however you prefer.

To make a dinner salad for two persons, slice 1/4 red onion very thinly and cut a ripe tomato into wedges. Add the beets and toss everything with extra-virgin olive oil and a splash of red wine vinegar. Season with course salt and pepper.

For a change, we added an herb, in this case several leaves of anise hyssop, chopped fine, plus some buds from the lavender-colored flowers that are now in bloom. You almost have to grow anise hyssop yourself--I've never seen it in the grocery--but it is a wonderful herb to have on hand, with its bright, almost sweet flavor of--as the name implies--anise.

You could also make this salad with a fine mustard vinaigrette. The vinaigrette would do well to bind all the flavors together and make an elegant presentation. Shallot could also substitute for the red onion and make for a more subtle flavoring. But for an easy everyday salad, we are happy with this very simple preparation, especially when the tomatoes are at their peak.

Tuesday, August 28, 2007

Pickling Beets

I planted my beets at the end of March and basically forgot about them. How sad is that?

Well, forgotten would be too strong a term. I knew they were there. I cast them a glance frequently in my tours around the garden. But they just never seemed to be getting big enough.

Finally I knew I had to do something about those beets. Would they still be edible, nearly five months later? I knew there would be more than we could possibly eat. I decided to pickle them.

Isn't the point of pickling to keep large quantities of food for later? I think that was the original point. Now we rarely give a second thought to pickled foods, unless it's some sort of gourmet pickle. But pickles do make interesting gifts, if you happen to know someone who likes pickles, and there are more pickle lovers out there than you might think.

Pickling these beets turned into quite a process. First there's the business of getting them out of the ground. I used my forked spade to get underneath them and heave them up a little. Try to get as much dirt off them right there, so it falls back into the garden. I put the beets into a plastic basic to give them a wash. Then cut the stems off with the leaves.

I brought the stems and the beets into the house separately. I wanted to cook the leaves, because they are delicious when they are fresh. That means snipping the leaves from the stems with scissors, then filling the kitchen sink with water and washing the leaves. They then go into a hot skillet with some extra-virgin olive oil to cook down. I season them simply with course salt and black pepper.

The beets, meanwhile, need to be separated according to size. The smaller ones will cook fast than the bigger ones, of course, so no sense putting them all in the same pot. In fact, I will eventually have five different piles of different-sized beets. I start a big pot of water to boil and give all the beets a good scrubbing in the sink.

The beets need to be cooked before the are pickled. I cook them in batches, testing for doneness with a trussing skewer, the lay them out on sheet pans to cool. When they are cool enough to handle, I remove the stem ends and skins with a pairing knife. The skins should peel away very easily. I then cut the cooked beets into pieces and put them aside. Depending on the size of your beets, you can cut them into wedges or slices, whatever you prefer.

The recipe I chose for pickling is traditional using vinegar, sugar, allspice, cloves and cinnamon. Jars and lids need to be in perfect condition and sterile. I purchased new pint jars and lids and sterilized them in a large pot with a strainer basket, the same aluminum pot I use for making pasta. Special canning pots and tongs for handling the jars are available. I fashion my own tool for handling the jars by wrapping rubber bands around the working end of my spring-loaded tongs.

Place the cleaned jars on a baking sheet and hold them in a 200-degree oven. To make 8 pints of pickled beets, you will need 3 quarts of cooked beets, cut into pieces. In a heavy pot, mix 2 cups sugar, 2 sticks cinnamon, 1 tablespoon whole allspice, 1 tablespoon whole cloves, 1 1/2 teaspoons salt, 3 1/2 cups white vinegar, 1 1/2 cups distilled or filtered water.

Bring the pickling mixture almost to a boil, then add the beets, again bring almost to a boil, reduce heat and simmer for 15 minutes. Ladle the beets and liquid into hot canning jars, screw on lids and process for 30 minutes according to manufacturer's instructions, which generally means boiling the jars fully covered in the water bath.

Remove the jars to cool, then store in a cool, dark place. They should be ready to eat in six to eight weeks.

Wednesday, August 22, 2007

The Truth About Beet Greens

If you've spent any time at all reading recipes you haven't escaped the standard admonition when preparing beets to be sure to use the beet greens. Not only tasty, are these greens we're told, but so darned good for you as well.


To which I respond: Have you ever tried actually cooking the greens that typically come with a bunch of beets at the grocery store?


First, the beet greens you usually find in the grocery store aren't very appetizing at all. They look old and ragged, probably because the average beets in the average grocery store have been in transit and in storage for a week or more.


Secondly, after you separate the good leaves from the bad and trim them and wash them, what you get after turning them over a couple of times in your cook pot is a whole lot of nothing. Even if the leaves had a fair amount of life to them when you bought them, they cook down to such a small amount that you question why you bothered at all.


How many beet greens do you need--really--to make a meal?


Finally, there's the matter of flavor. Try as I might to actually consume the beet greens from the supermarket, I can hardly swallow them. The flavor's not there. I don't see the point.


All of these things were playing at the back of my mind last night as I prepared a quick and easy dinner for a couple of friends. Since these were gardening friends, I wanted to show off the produce we have growing in our yard. The menu soon consisted of tomatoes with basil and fresh mozzarella, carrot salad, beet salad and some sort of protein--oh, what the heck: a frittata. But what to put in the eggs? Onions for sure, but it needed more....


The solution hit me like a flash as I was preparing the beets. After removing the stems what lay before me on my cutting board was a pile of the most gorgeous beet greens you've ever seen. Big, strapping, luxuriant greens. These were the antidote to every bad experience I'd ever had with beet greens. And why not? They'd just been plucked out the garden. They couldn't have been fresher.


I didn't have time to search for a fancy treatment for these greens. Somehow, they had to make their way into a six-egg frittata. So I did the easiest thing I know of, which is to heat some extra-virgin olive oil in the bottom of my cast-iron skillet. I washed the greens, then tossed them a handful at a time into the skillet, turning them as they wilted to make room for more.


As I said, beet greens will cook down quite a lot and these greens did shrink as well. But when all was said and done, these greens were meaty. These greens had muscle. And the flavor? Oh, mama! I could have eaten these greens all night, seasoned with just a shake of course salt and some freshly-ground black pepper.


But there was no time to dilly-dally. When the beet greens were cooked through, I used my tongs to squeeze the excess moisture out of them right there in the skillet, then gave them a quick chop and transferred them to my fittata pan. Sauteed onions, beet greens, parmesan cheese--that was some frittata.


This morning I went out to the garden with a new mission: find more beet greens.

Wednesday, August 15, 2007

Golden Days

Enough talk. Let's eat.


All told, I've been away from the garden a full month this season. Long enough for the cucumbers to swell to bursting, the okra to get tough as wood, the beans to shrivel on the vine.


But last night we cut through all the whining, determined to make a meal of our labors. First, the carrots. I used to just scatter the carrot seed in patches, but I was never one for thinning the sprouts. So I've gotten smarter and started poking small holes, adequately spaced, in the soil with my finger, then planting the seeds one-by-one.


We have three carrot patches now, planted in succession with many different varieties, and the ripest one was in full bloom. For some reason, the yellow carrots are the first to bolt and the most temperamental where ripeness is concerned. So I went after the flowering carrots first and sure enough that yielded a bounty of goldens. These and the few traditional carrots I cleaned, peeled and grated into a curried carrot salad with apples.


The dressing is simply mayonnaise mixed with some homemade chive vinegar (or white wine vinegar), lemon juice, extra-virgin olive oil (you could use a lighter oil, such as grapeseed or walnut oil), curry powder, sugar, salt and pepper. I usually add raisins as well, and you could throw in some toasted almonds or walnuts, but I was on a mission and forgot.


Note: Harvesting and cleaning carrots is fun but labor intensive. It helps to have a helper.


Next, the beets. I had wonderful success last year with fall Chiogga beets, but darned if I can get the spring-planted beets to do much. They only want to grow so large, then they stop growing and just sit there soaking up the sun. I think I need more organic matter in the soil. But in another area with well-amended soil, I planted golden beets and these have thrived. I started pulling a few of them and some proved to be enormous. After cleaning and trimming, I set them to cooking in a large pot of water until tender.


Remove the beets to cool. When they can be handled, rub the skin off and trim the remains of the green tops. Cut into slices or wedges, then dress with extra-virgin olive oil, red wine vinegar, salt, pepper and chopped chives from the garden. Even better, add wedges of ripe red tomatoes and slices of red onion.


Finally, I have to say I am kicking myself a little over our dark Italian kale. It was doing fabulously--it was far and away the star of this year's garden--even after we'd been gone in Mexico for two weeks. That is, into the beginning of August. But a terrible heat wave descended on the District of Columbia lasting several days while we were away in Maine and the plants suffered a mighty scorching.


The harlequin beetles were moving in for a feed--a sure sign that the Brassicas are done. So I pulled all the plants out of the ground one-by-one and selectively culled the leaves that had not been too terribly affected. What I harvested was a mere fraction of what the plants had actually produced. But such are the consequences of being absent from the garden at the precise moment when it needs your attention. My timing, in other words, is pretty atrocious.


Nevertheless, what we had was enough kale for several meals. To salvage the lot, I just put a large pot of salted water on the stove to boil, trimmed the ribs out of the kale leaves, roughly chopped them, then cooked them at a very low boil until they were tender, about 30 minutes.

Most of the cooked greens I would pack and store either in the fridge or the freezer for later use. For our meal, I sauteed some onions from the garden, then some hand-crafted, hickory-smoked bacon. I then chopped the bacon and put that and the onions and three generous portions of the greens into the skillet with the bacon grease and heated it all through with a splash of apple cider vinegar, salt and pepper.


So much for cooking. Now, time to sit back and enjoy the view. Since starting the garden, we've had a family of goldfinches come to visit, now for the second year. One of them was perched atop the cone flowers, digging for seeds. When we sat for dinner, we noticed out the window that a squirrel had found a way to hang upside down at the top of the 10-foot-tall sunflower stem, and was munching away on the seeds.

Seems there's enough to go around for one and all. Bon appetit, everyone...

Tuesday, July 3, 2007

Life, Interrupted

One advantage to planting vegetables in raised beds is keeping weeds at bay. Even a separation of a few inches can save tons of aggravation.

Unfortunately, I do not have raised beds. I've tried to maintain some separation between my vegetables and the "yard" by digging a shallow trench around the vegetable beds. But the weeds are only a little deterred.

Finally, I could not bear to look any longer at the Chiogga beets I planted at the end of March. They were being overrun with crabgrass and other undesirables. Trying to separate the weeds from the beets and remove the weeds by hand proved to be more work than I could spare. In the end, I got my forked spade and lifted everything out of there.

I was careful to shake the soil back into the vegetable bed. What emerged from the tangle of greenery were these lovely little beets you see above, none of them any larger than a ping pong ball. Life interrupted, for sure. But I will try to salvage something of them.

After washing the beets carefully, I put them in the oven on a baking sheet to roast very slowly at 250 degrees. Big mistake, I think. They didn't cook so much as dry out. Still delicious, even with the skins on, mind you. But I think I would have been better off just slicing them raw and dressing them very simply with some extra-virgin olive oil and red wine vinegar.

Then, to rub salt in the wound, I arrived at a place in Fields of Plenty, my latest favorite tome on renegade farmers, where author Michael Ableman describes the root crops at a farm in Wisconsin:

"The Chiogga beets, an Italian heirloom with pink outer flesh and concentric pink and white circles inside, would normally be delicately proportioned at about 3 inches across. Here, they are the size of my fist, and nearly perfectly round. The rows of golden beets are full, with none of the gaps typical of this poor germinator.

"I rub a beet against the leg of my jeans, take a bite, and pass it on to Aaron. I am only slightly distracted from its dense, rich texture by the soil that is still attached...Although it's true that anyone can grow a beet, not everyone grows them like I see them here. To consistently produce volumes of perfectly formed roots, week after week, is not easy. I am humbled by these beets...."

Ableman marvels at the exceptional tilth of the farm's loamy soil and the "years of experimentation and refinement of skill" that went into the raising of those extraordinary beets.

So I should say it is probably not just the weeds, but the soil and the years of experimentation and refinement that are still an issue for my beets. Just more work to be done...