Showing posts with label garden. Show all posts

Wednesday, April 8, 2009

How Do You Keep Garden Records?

I must be terribly old-fashioned because I do not have a computer program to plan my garden.

Planning? Mostly I look at what's in my bag of seed packets, look at the garden, look at the seed packets and start digging.

It helps to plant more or less the same variety of vegetables year after year. With nine beds, it's not too hard to rotate. Sometimes it's not easy figuring out where all the big tomato plants are going to go. But more often than not I end up with empty spaces, wondering what I can fill them with. (There have been times I wished I didn't have so much lettuce.)

My basic tools are some thin bamboo poles for dividing the beds into squares, a tape measure and a spiral bound book where I record what I have done. I've gotten pretty good at planting freehand, meaning moving my bamboo poles to create fairly precise little areas in which to plant a few radishes, say, or carrots or an area of several different varieties of lettuces.

Not far away is my book where I sketch out the bed with pencil, then make notations on what is planted in the squares and the date it was planted. I've never had to buy labels for my garden beds. Whenever I need to remember what I've planted, I just pull out the book. It also works as an excellent log. If I need to know planting dates, for instance, the book tells me instantly. I can also make notes on how long things took to germinate, which varieties did well and which didn't.

I'm not sure this would be so simple on the computer. But maybe there are some laptop gardeners out there who know better.

How do you keep your garden records?

Tuesday, April 7, 2009

Look What's Coming Out of the Ground


Excuse me while I gush over my fava beans. They are one of the first plants to emerge in the spring and they also happen to be one of the most interesting. As they grow, favas assume an architectural yet almost prehistoric looking structure. You would hardly know they were a bean. Yet these are the original beans of the Old World, the so-called broad bean. We love to smash them with peas and Romano cheese and smear them on bruschetta.

The peas are coming up. There's a long row of them in a bed where I plan to plant mostly beans this year. As they get taller, I will drive wooden stakes into the ground and tie string to give the peas something to hang on to with their little tendrils.

The leaf lettuces have all germinated, along with the radishes and all of our brassica greens: arugula, mizuna, tat soi and mustard. We are seeing the first signs of the new Swiss Chard as well as beets. Carrots take long time to germinate and we are still waiting to see the parsnips and burdock emerge.

Some weeks ago I planted seed trays with four heirloom varieties of tomatoes: Cherokee Purple, Mortgage Lifter, Dr. Carolyn (a golden cherry tomato) and Roma. They've already been moved into larger pots and are towering over the bell peppers and eggplants. We have a few broccoli plants and kohlrabi, as well as many little parsley, cilantro, dill and chervil. They will be strategically placed in the garden so that we have a steady supply of fresh herbs. The cilantro will bolt quickly, of course. That's one herb that doesn't take very well to our hot summers here in the District of Columbia and needs to be planted repeatedly.

And for the first time we've planted onions from seeds. In the past, we always started our onions from small sets, but they never seemed to get very large. Every day lately I've been carrying the trays of onion plants outside for sun, but it's been a cool and often dreary spring this year. (Great for the spinach, another favorite that's quick to bolt in the heat.) We've seen frequent rain and wind. We should be transplanting the onions soon.

This is one of those traditional times when the garden isn't yielding much in the way of ingredients for our kitchen. But there is great hope and lots to keep an eye on. Meanwhile, we are still eating last year's pickles.

Monday, April 6, 2009

Have Garden, Will Trade for Sausage

Last year I began trading some of the produce we grow in our kitchen garden here in the District of Columbia for venison a neighbor harvests on a family farm in Virginia. So far we had received two large packages of venison stew meat and some tenderloin. My last gift to them was a box full of pickles and preserves, a sampling of the many jars we had left over from the summer.

The neighbors said they were enjoying the pickles and hinted that more venison was on the way, this time in the form of some sausages. "It's being processed now," they said.

Then one night a figure appeared at the store carrying a strange looking load. I turned on the porch light and had a long, frozen package thrust in my direction. When I unwrapped it, this is what I found: two 20-inch long venison summer sausages, the biggest sausages I've ever seen.

Truthfully, I wasn't expecting much from this sausage. As you can see from the label, it was processed for private consumption only. There are big letters indicating "Not For Sale." I thought it would be dry and tasting of who knows what. But that just shows you how little I know about venison sausage. This summer sausage is some of the best stuff I've ever tasted, moist and meaty and--how to say this--barely distinguishable from the finest beef sausage.

That leaves just one question: what to do with two 20-inch long sausages?

I decided we should start eating some immediately, put some away in the freezer and share the rest with friends. So after the sausage defrosted, I cut it into portions. And began eating...I think I have a new favorite high-protein snack.

Meanwhile, the neighbors will be getting two fine tomato plants. We are growing them now and soon will be planting them in the garden. They'll be able to come by any time and pick what they like. Does that sound like a fair trade to you?

Monday, March 2, 2009

Too Soon for Potatoes?

Just a few days ago it was starting to look like spring around our kitchen garden here in the District of Columbia, about a mile from the White House. I was able to get out and sow spinach and fava bean seeds. And today my seed potatoes are scheduled to be shipped from Maine. But somehow I think planting them may yet be a while off. (It's supposed to hit 60 degrees later in the week.)

Monday, February 23, 2009

Prize Worthy Sweet Potato Galette


How did the North Carolina Sweet Potato Commission know we are growing our own sweet potatoes?

I just received an e-mail urging me to enter a "bloggers recipe contest" sponsored by the sweet potato commission. I might have blown it off, but the reward for best recipe is $1,000. That got me thinking maybe I should post one of our favorite methods for putting sweet potatoes on the dinner table--this sweet potato galette.

A potato galette in the French country style traditionally is made with standard potatoes. But we love sweet potatoes--they are so nutritious and full of flavor--and now we harvest them out of our own kitchen garden, right here in the District of Columbia about a mile from the White House. One day I was trying to think of a way to incorporate sweet potatoes with something else we grow plenty of: greens. And to continue the local theme, I decided to add one of our favorite Maryland cheeses. Why not layer them all together? The sweet potato galette was born.
To make the galette, preheat your oven to 350 degrees.


Coat the bottom of a well-seasoned, cast-iron skillet with extra virgin olive oil and place it over moderate heat. Peel three large sweet potatoes and slice them into thin rounds. (A mandoline makes quick work of this.) Shingle the rounds to cover the bottom of the skillet. The bottom-most potatoes will begin to cook and brown while you are assembling the rest. Between each layer, dot the potatoes with cooked greens, such as mustard greens or kale or collard greens. Or, better yet, a combination of greens. You will need about one pound of cooked greens total.


Alternate layers of cheese. I've used a soft Gorgonzola in the past. But for a strictly local galette, I bought a piece of blue goat's milk cheese from Firefly Farms in Bittinger, MD. Firefly is one of the regular vendors at the Dupont Circle market. Between each layer, after you've capped it off with more potatoes, press down very firmly with a flat object, such as a pot lid or another skillet. Then season with olive oil, salt and black pepper.

Continue layering the galette until the skillet is nearly filled to the top. Place in the oven and bake until the potatoes are easily pierced with a metal trussing skewer, about 20 minutes. Remove the skillet and allow the galette to cool. To remove the galette from the skillet, use a knife or spatula to cut around the edge, then invert it onto a large plate or cutting board.


This galette is delicious warm or even at room temperature, and it can easily be made ahead and reheated. The sweetness of the potatoes seems to meld exceptionally well with the pungency of the cheese and the pleasant bitterness of the greens. Try it with your favorite local salad and a crisp glass of Chablis. Or if you've got a particular hankering for meat, this galette would be an ideal partner for a juicy pork roast.

Sunday, February 22, 2009

Overwintered Carrot Cake

My wife, the baker in the family, took one look at our recent harvest of overwintered carrots and knew what she had to make: carrot cake.

I know what you are thinking: There could hardly be anything more mundane than carrot cake. But trust me: once you've made it with carrots you've grown in your own garden, carrots that have been storing themselves in the ground and getting sweeter all winter long just waiting for you to think of something to do with them--once you have some of those carrots to work with your carrot cake will rise to something special indeed.

Plus, my wife does not make ordinary things. Her baked goods invariably are extraordinary. This particular carrot cake is infused with the flavor of ginger and topped with an orange-cream cheese frosting. We liked the first one so much (meaning it lasted until maybe the next day) that she made it again and cut it into these cheery little morsels to serve at our recent chilaquiles brunch. It wasn't long before the only thing left on the buffet were a few crumbs.

Here's the recipe as found in The New Best Recipe, from the editors of Cook's Illustrated:

For the cake:

2 1/2 cups (12 1/2 ounces) unbleached all-purpose flour
1 1/4 teaspoons baking powder
1 teaspoon baking soda
1 1/2 teaspoons ground ginger
1/2 teaspoon ground cinnamon
1/2 teaspoon ground nutmeg
1/8 teaspoon ground cloves
1/2 teaspoon salt
1 pound carrots, peeled
1/2 cup finely chopped crystallized ginger
1 1/2 cups granulated sugar
1/2 cup packed light brown sugar
4 large eggs
1 tablespoon grated orange zest
1 1/2 cups canola oil

Place an oven rack in the middle position and preheat oven to 350 degrees. Spray a 13 by 9-inch baking pan with nonstick cooking spray. Line the bottom of the pan with parchment paper and spray the paper as well.

Whisk together flour, baking powder, baking soda, spices and salt in a medium bowl and set aside.

Shred the carrots using the shredding attachment in a food processor(there should be about 3 cups). Add carrots and crystallized ginger to bowl with dry ingredients and set aside. Wipe out food processor and fit with metal blade. Process granulated and brown sugars with eggs and orange zest until frothy and thoroughly combined, about 20 seconds. With machine running, add oil through feed tube in a steady stream. Process until the mixture is light in color and well emulsified, about 20 seconds longer. (Note: these steps could also be done using an ordinary box grater, a mixing bowl with a whisk and some elbow grease.) Scrape the mixture into a large bowl. Stir in the carrots and dry ingredients and mix until everything is fully incorporated. Pour mix into prepared baking pan and bake until a toothpick or skewer inserted in the center of the cake comes out clean, 35 to 40 minutes, rotating the pan from front to back halfway through the baking time. Cool the cake to room temperature in the pan on a wire rack, at least 2 hours.

For the frosting:

8 ounces cream cheese, softened but still cool
5 tabelspoons unsalted butter, softened but still cool
1 tablespoon orange juice
1 tablespoon grated orange zest
1 1/2 cups (5 ounces) confectioners' sugar

When the cake is cool, process the cream cheese, butter, orange juice and orange zest in a clean food procewssor until combined, about 5 seconds, scraping down the workbowl with a rubber spatula as needed. Add the confections' sugar and process until smooth, about 10 seconds.

Run a paring knife around the edge of the cake to loosen it from the pan. Invert the cake onto a wire rack, peel off the parchment and invert the cake onto a serving platter or cake stand. Using an offset spatula, spread the frosting evenly over the surface of the cake. Cut into squares and serve.

Sunday, February 15, 2009

February Harvest Dinner

Here's some of the venison we recently received in trade with one of the neighbors for pickles and other preserves we put up in the summer.

Apparently the neighbors have family with a farm in southern Virginia and have been plying us with venison in exchange for our home-grown produce. What they are most interested in are tomatoes. So this year we will be installing a couple of tomato plants in the garden that they can harvest from any time they like. In the bargain, we get a steady supply of the venison they harvest on the farm.

Call it town meets country.

I didn't do anything special with these venison tenderloin. After defrosting them a few days ago, I just wanted to make sure they got eaten. Season with extra-virgin olive oil, salt and pepper, grill on the Jennaire. I did have some leftover sauce from one meat dish or another to put a smile on that venison when it came to the table. The carrots and parsnips you see in the background are some of those recently harvested from the garden, roasted with thyme. Mashed potatoes round out the picture.

And I still have three portions of that tenderloin left over.

Saturday, February 14, 2009

February Harvest

Carrots have stored very nicely in the ground. And since we've been experiencing a bit of a thaw the last week I went out and started preparing beds for planting. While I was digging around, I pulled up this lovely bunch, about five pounds worth.

We've been pulling occasional parsnips through the winter. These were planted last spring and were starting to show new growth on top. Time to pull them before they get too tough to eat.

Lots of beets as well. Some will go into our favorite beet salad with red onion and red wine vinegar. The rest we'll try to store. But not to worry. No chance they'll go bad. We love beets too much.

Thursday, February 12, 2009

The Onion Experiment

There's just so much to learn about food gardening that it can't possibly be thought of as anything but a lifelong process. This year it's onions we are trying to focus on. We'd like to get those right so we are planting them from seed.

The last couple of years we planted onion sets that we bought from our farmer friend Mike. Onion sets are simply onions from last year that are pulled from the ground when they were still small, then stored until spring for re-planting. Ours never seemed to get large enough after we planted them in the garden. I asked Drew Norman about it when I was visiting him at One Straw Farm over the summer. He said onions do much better when planted from seed.

Since then I've learned that there are three different types of onions to select from depending on which area of the country you live in. There are "long day" onions, for instance, that are bred to perform well in the more northerly latitudes, where the sun shines much longer during the summer. There are "short day" onions better suited for the southern states where days are shorter during the summer. Finally there are "intermediate" onions that do better somewhere in the middle.

Well, guess what? The line separating "long day" from "short day" onions runs right through the District of Columbia where we live. So which onion to choose? I decided to try some of each. I opened our copy of Johnny's Seed catalogue to start the search.

Some seed catalogues list their onions as "long day," "short day" or "intermediate." Johnny's, by contrast, indicates in the description of each onion the latitudinal range in which it will do best. The District of Columbia sits at 38 degrees latitude. The onion "Candy" caught my eye. It is supposed to do well in the 33-40 degree latitude range, which makes it an "intermediate" onion. I ordered some of those. The onion "Copra" is supposed to produce large, sturdy bulbs that store for a long time. It does best in 38-55 degrees latitude, making it a "long day" onion, just on the edge of our range. I also picked a red onion, "Ruby Ring," that is adapted to 35-50 degrees latitude, according to Johnny's. This is supposed to be an "excellent red storage type," and since we love an occasional red onion, I had to have it.

I also selected two different bunching onions or scallions, one to grow through the season and another hardy variety to over-winter. I'm sure we'll have more than enough of those. And since ordering my seeds I've learned something else about growing onions: if you don't want to bother with sets or planting seeds in trays, you can buy bunches of young plants.

Already I can see some advantages to buying onions as plants. Onion seeds are normally planted in trays very early in the year, January or February. But unless you have a greenhouse or a grow light system, you may have trouble giving the seedlings enough light after they've germinated. The sun is still very low in the sky. It hits our window at a sharp angle before disappearing around the corner.

I planted our seeds a week ago. They are just starting to germinate. I only hope we get enough sun through the window. Or perhaps it will be warm enough to set them outside during the day. That's what makes this an experiment. Fortunately, if all else fails, I'll still have time to buy bunches of young plants and get them in the ground.

Monday, February 2, 2009

My New Forked Spade

How do you like my new spade?

I got tired of my wooden-handled model breaking in winter, usually around the compost heap or digging up carrots or wherever the earth was a little bit frozen. So I ordered this one from Lee Valley Tools. It's stainless steel with a plastic cover and grip, guaranteed never to fail. It set me back a bit, but I figure it's worth investing a little extra in a tool that will probably last a lifetime. Along with my stirrup hoe, I use the forked spade around our kitchen garden more than any other tool.

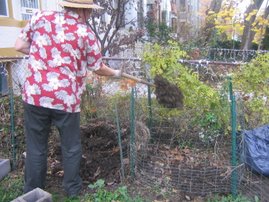
I thought I'd baptise the new spade in our compost heap. It was frozen almost solid on top and around the sides, but the stainless spade made quick work of turning the pile into a neighboring bin. Not much decomposition going on this time of year with temperatures steadily below freezing. But you'd be surprised at the number of earthworms still active at the bottom of the pile. I'll bet they don't like me turning their home upside-down in the middle of winter, but I'm sure they'll find a warm spot to hang out.

While I was at it, I tossed a year's worth of shredded personal documents into the bottom of the pile. It's nice to know that our bank statements will soon be feeding the tomato plants.

Friday, November 21, 2008

Potato Demise = Baby Potatoes

We've been watching several volunteer potato plants and cheering them on as fall stretches toward winter. Would they actually survive long enough to make new potatoes? They were in the pink of health well into November and seemed to love the cooler temperatures. But then this week a blast of arctic air moved into the District of Columbia. Temperatures dipped well below freezing--into the mid-20s--and our hardy potato plants were done for. Overnight, they simply fell to the ground with no hope of a rebound.

Well, yesterday I went out and dug up two of those DOA plants and this is what I found under the soil surface--tons of new potatoes. In fact, I would venture to say these potatoes are far more productive in the fall than they are during the District's scorching summers when we are normally growing our potatoes.

As an experiment, we had planted a full bed of potato sets back in September. Normally we plant potatoes here around St. Patrick's Day. These plants also crumped and when I checked, there were no new potatoes to harvest, just tiny little buds. Now I'm thinking that if I had thought this through more thoroughly, I might have built a plastic tunnel over these potatoes and they might have survived. Imagine harvesting potatoes in January....

Rather than digging these plants up, I will leave the original sets in place. Maybe--just maybe--they will survive into the spring and start over again making more potatoes.

Wednesday, October 22, 2008

The Great Tomato Cleanup

It is with mixed feelings that I take down our tomato plants. These 13 plants--five different varieties--have been extremely good to us, keeping us in tomatoes every day for months. In fact, they are still making tomatoes, still blossoming, still sending up new growth. But the days grow short and the nights cold. It is time to clear the beds and move on to the next thing.

We compost just about everything around our home here in the District of Columbia. We send very little to the landfill. But I do not compost tomato plants. We live in a perfect climate for various tomato diseases and our plants invariably pick up one sort of wilt or another. I don't want to introduce those diseases to our compost pile. Instead, I take great care to cut the tomato plants into small pieces, bag them and put them out with the trash. I wish it weren't so, but I can't think of another way. One tomato guru even sanitizes his metal tomato cages each season with a blow torch.

I collected another bowl this size with ripe or ripening tomatoes. These green tomatoes--many pounds of them--will make more of our favorite green tomato and apple chutney, perhaps a green tomato jam. There may even be a fried green tomato BLT in our future. These are some of the joys of fall's Great Tomato Cleanup.


Saturday, October 11, 2008

Swiss Chard with Lemon and Garlic

Swiss chard is such an underrated vegetable, yet it has emerged as one of our favorites. Few vegetables are as constant as chard--always thriving, always ready to give. Chard seems to have hardly any season at all. It grows all year 'round, though it does seem to be especially happy in these cooler months of early autumn. It will survive straight through the winter and be ready for harvesting again first thing in spring.

This is what our chard looks like this morning--bursting with life. I have to admit, we've neglected it. We haven't been eating much chard the last few months, for no particular reason. But the plants don't mind. They just get bigger and sturdier.

I harvested some chard this week, which couldn't be simpler. You just break off the thick stems at the base, or cut them off with a sharp knife. For some reason Americans are fixated on the leafy part of the chard, but I find the stems have more flavor to go with an extra bit of texture. I feel we are at a bit of disadvantage where chard is concerned because we only grow the ruby type, with dark red stems. It has a sweet flavor like its cousin, the beet. The green variety of chard is more savory.

My go-to recipe for chard involves seasoning with pomegranate molasses. But in the interest of diversity, I wanted to try something different. So here's another method of cooking chard that's less sweet but does just as good job of showing off everything chard has to offer, which includes lots of good nutrition.

Take several large stalks of chard and wash them well. Tear off the leaves and cut the stems into bite-size pieces. Over moderate heat, pour some extra-virgin olive oil into the bottom of a heavy pot or Dutch oven. Add the chard stems, season generously with coarse salt and add a couple tablespoons of water. Cover the pot and let the stems cook.

Meanwhile, chop a few garlic cloves and add those to the pot. Chop the zest from 1/2 lemon, add that and the juice from the lemon to the pot.

Roll the chard leaves into a tight cigar shape and cut them cross-wise into a thick chiffonade. Drop these into the pot--they should be a bit damp from the washing. They may make a big pile in your pot, but not to worry. They cook down quickly.

Reduce heat and continue cooking gently until the stems are very tender, about 30 minutes. The chard leaves will have completely wilted. Adjust salt and season with freshly ground black pepper. Serve hot as a side dish with your favorite roast, or over rice as a simple meal.

Chard can be cooked like this ahead of time and frozen, or stored in the refrigerator for use another day.

Sunday, October 5, 2008

Goodbye, Old Fried

Sometimes it's hard to let go. This hat had served me well. It kept the sun off my face and marked me as a gardener. It became part of my identity. I wore the hat until it was in tatters. Finally, it was time to say goodbye to one straw hat that had served its purpose well. It goes into the compost heap to serve another day.

Thursday, September 11, 2008

KIds Can Tomatoes

We are overwhelmed with Roma tomatoes from our garden. Perhaps this is a good time to teach the kids in my "food appreciation" classes a thing or two about canning.

First job is to blanch the tomatoes in a big pot of boiling water for about 20 seconds (15 seconds is about the minimum). Chill them quickly in a bowl of cold water. As soon as they are cool enough to handle, you can start peeling away the skins.


Blanching loosens the skins. I teach the kids to make a small cut at the pointy end of the tomato, then pull the skin away in strips with the aid of their trusty plastic knives.


Once the skins are completely removed, we cut the tomatoes into quarters lengthwise, then cut the quarters into small small pieces or dice. The dice then go into a pot to be boiled for a few minutes. Ten or 12 will fill a one-pint jar. I show the kids how to ladle the tomatoes into a sterilized canning jar, add 1 tablespoon lemon juice and 1/2 teaspoon salt before screwing on the lid and processing the jar in a boiling water bath for 35 minutes.


But we also want something to snack on as a reward for all that tomato prep. So we peeled some more tomatoes and turned them into an easy pasta sauce with some sauteed onions and finely grated Parmesan cheese. A sauce of tomatoes fresh from the garden delivers uncommon flavor. The kids quickly wolfed it down.

Monday, September 8, 2008

Black Radish Kimchi

Cleaning out a garden bed recently I discovered these four black radishes. It's hard to tell from the photo, but the three largest are all about the size of a fast-pitch softball. I have never seen radishes like this before (this is our first year for black radishes) and what is most amazing of all is they are still edible. For some reason, no matter how big they get, and at a point when most radishes are bursting out in flower and turning into wood, these black radishes are still soft and creamy.

Okay, so I'll find some way to eat them, I thought. And it just so happened I was already making cabbage kimchi and right next door to the recipe for cabbage kimchi was one for radish kimchi.

That would be on page 49 of Sandor Elix Katz's "Wild Fermentation." I improvised a little, using my black radishes instead of daikon radish, omitting the burdock and using some of my own turnips. This kimchi also includes horseradish to punch up the flavor.

Peel the radishes and cut them into wedges. Slice the wedges thinly. Do the same with two large turnips. Toss with two large carrots, also sliced thinly on an angle.

Place the vegetables in a large bowl or bucket, cover with water to a depth of about 1 inch, then remove the water, measure it and create a brine according to this formula: 3 tablespoons pickling or additive-free sea salt for each quart of water. Add the brine back to the vegetables, cover and allow to sit 24 hours.

After 24 hours, drain the vegetables, reserving the brine.

Meanwhile, make a past or slurry by finely chopping 6 peeled garlic cloves in a food processor. Add six red hot chilies (such a jalapeno)--seeded and deveined-- and chop fine. Add two large onions and process these until a slurry is achieved. Add about 1 cup freshly grated horseradish and 1/2 cup grated ginger.

Mix the slurry with the root vegetables and place in a crock or non-reactive bucket (I use a heavy-guage plastic bucket). Press the vegetables firmly with your balled-up fist until a brine rises to the top. If there isn't enough brine, add some of the reserved soaking brine. Cover with a ceramic plate, again pressing down firmly until the brine rises over the plated. The vegetables must be completely submerged to ferment and avoid spoilage. Weigh the plate down with a large plastic container filled with water.


Cover the crock or bucket with a tea towel to keep out dust and place in a cool, dark place to ferment. Taste the vegetables occasionally until they have fermented to your taste, then refrigerate, either packing the kimchi into jars or placing the whole crock or bucket in the refrigerator. The kimchi should keep for months.

I made this kimchi about a week ago and already it is starting to taste like the real deal.

Saturday, September 6, 2008

Green Beans with Sauteed Cherry Tomatoes

This is a great match: our meaty, full-flavored Romanette green beans with sweet Dr. Carolyn cherry tomatoes.

We think these golden cherry tomatoes are the best ever, with an assertive sweetness and round flavor. I was happy to see our opinion confirmed in the Southern Exposure Seed Exchange catalogue. "The most flavorful yellow cherry tomato we have grown," they write. "It has an excellent balance of sugar, tartness and depth of flavor."

In case you are wondering where "Dr. Carolyn" comes from, the tomato is named for Dr. Carolyn Male, one of the country's foremost tomato experts and the author of "100 Heirloom Tomatoes for the American Garden." In fact, it was from that book that I first thought to purchase some Dr. Carolyn seeds.

We have just one plant in our garden this year, but it is covered with golden tomatoes--more than enough for us. Plus, the plant seems utterly resistant to the fungal diseases that otherwise ravage less sturdy tomato varieties in our hot, humid District of Columbia climate.

We are also in love with these Romanette beans, an Italian variety of flat bean that grows profusely on compact bush plants. So easy to grow, and so productive. They make a perfect side dish simply cooked in salted water, then dressed with olive oil and grated Parmesan cheese. But combining them with the Dr. Carolyn tomatoes results in an ecstatic mingling of late-summer flavors.

Simply get a non-stick saute pan very hot on the stove, coat the bottom with extra-virgin olive oil and drop in a small bowl full of halved cherry tomatoes. While they sizzle, season with coarse salt. Toss one or two times until the tomatoes are showing the faintest hint of brown and are beginning to melt. Then toss in cooked green beans, season with a little more salt and freshly ground black pepper. Drop in a few basil leaves cut into a chiffonade and a splash of sherry vinegar. Toss a couple of times until the beans are heated through.

The final result isn't exactly pretty, but you'll be eating it right out of the pan.

Monday, September 1, 2008

Out With The Cukes

Today was time to say goodbye to our cucumber plants. They've been great producers, making hundreds of pickles. Pulling them out of the ground isn't easy after watching them daily since they were first planted on May 25. I gather one last bowl of cukes. You can see how the plants as they age begin making cucumbers of unusual shape and color.

This is what they looked like, on the right, only a couple of weeks ago. We planted two varieties of pickling cucumbers, Cross Country and Rhinish. They eagerly climbed a trellis made by hanging string from PVC pipe. Filling out the bed were several Italian zucchini plants and, at the far end, two Tuscan kales.

This is the same bed this morning, after the cucumbers were torn from the trellis and the squash plants pulled from the ground. It's time to get this area ready for a new crop. We want to try a second planting of potatoes. Potatoes are normally planted around St. Patrick's Day, but we have some seed potatoes from our farmer friend Mike, who thinks at a minimum we should be able to harvest a nice batch of "new" potatoes before the first hard frost.

The cucumber plants, meanwhile, were carried to the compost heap and chopped into smaller pieces. Their destiny now is to feed next year's crops. They have our thanks.

Saturday, August 30, 2008

Fighting Nature

Maybe I shouldn't be so shocked, but I'm still surprised when I run across a gardener who insists on being able to control nature.

A Master Gardener friend recently contacted me asking if I knew an expert who could talk to her garden group about growing tomatoes . Noting that problems with fungi were "particularly worrisome," she threw down the gauntlet: "Need to learn more about it and how to control it."

When I suggested that the high heat and humidity in the District of Columbia provide an ideal environment for fungi, and that selecting disease resistant tomatoes might be a better strategy than trying to keep fungi out of the garden, she got downright testy. My advice was "not helpful," she said. "I have grown tomatoes for over 35 years and it is a bit more complicated than just looking for the resistant ones. The fungi has (sic) been a concern with local gardeners here and I am looking for a person who has technical info about controlling the spread and what are the options."

I guess this falls into the category of no good deed going unpunished. But it got me thinking--or rather wondering whether I am simply crazy for thinking that trying to grow tomatoes organically and avoiding fungi are not concepts that work easily together in the same sentence. And am I missing something when I can look at the varieties of tomato plants in my own garden and observe that some of them clearly are more resistant to disease than others?

First, I should say that I have very little experience with pests and diseases in my garden. I rotate my crops every year. I use lots of compost I make myself. I do very little watering. But I don't know that I've ever seen a tomato plant--either in my own garden or elsewhere--that did not experience wilt or some other common ailment at some point in its life. Fungi are everywhere, and they are the most common destroyer of plants.

I looked online and found a report from the University of Maryland stating that commercial tomato growers in the state commonly spray fungicides on their plants. But they also practice crop rotation and selection of resistant varieties.

Standard practices besides rotation are to avoid planting tomatoes where other nightshade cousins such as potatoes, peppers and eggplants were growing previously. Keep tomato plants well separated to promote good air circulation. Try to keep the foliage dry--don't water from the top down. Don't touch tomato plants when they're wet. Wash hands and tools after handling tomatoes. Remove and trash (don't compost) diseased tomato plant material. Disinfect tomato cages before reusing.

I admit, I intially was not happy about the way my Mortgage Lifter tomatoes started to wilt early in my garden this year. They are a bit unsightly, but boy are the tomatoes good--big, juicy and full of flavor. Integrated Pest Management practices would have me consider whether I can live with the wilt as long as my Mortgage Lifters are producing such great fruit. More and more I'm inclined to think the wilt is tolerable. Our Cherokee Purples and Dr. Carolyns, both heirloom varieties like Mortgage Lifter, have suffered very little. On the other hand, our Striped Zebra plants hardly grew or produced at all--they were completely overcome with wilt. (I see a battle coming, as my wife really likes Striped Zebra tomatoes and can't believe there isn't a way to grow them successfully here.) My Big Boy plant, meanwhile, which is a modern variety, not an heirloom, has survived the whole season without wilt, but the fruit isn't nearly as good at the Mortgage Lifter or Cherokee Purple.

So how do you feel about this, fellow gardeners? Is fungus something we need to control, or are there ways we can co-exist with microbes and still grow great tomatoes?

Note: Southern Exposure Seed Exchange, one of my favorite seed providers located not too far from here outside Charlottesville, Virginia, sells a more disease resitant strain of Mortgage Lifter. The fruit is said to be a little smaller, but equally as delicious.

Friday, August 29, 2008

Kohlrabi Gratin

I have a secret love for kohlrabi. Kohlrabi has a wonderful, sweet flavor somewhere between turnip and broccoli. But you so rarely see it for sale anywhere that we mostly just dream about it. That's why we planted it in the garden this year--to satisfy our craving for kohlrabi anytime we like.

Our friend Larry calls kohlrabi "a little sputnik" because of its globe shape sprouting long leaf stems. It's not a root vegetable, but a swollen stem. Until recently, it never occurred to me that the leaves might be edible. That's something we'll have to try. Meanwhile, I usually prepare kohlrabi as simply as possible, just cutting it into large matchsticks, cooking it in salted water and tossing it with melted butter. But I wanted to do something that would really make kohlrabi shine. I thought it would be a perfect candidate for a gratin.

I make a delicious rutabaga gratin, and a dynamite sweet potato gratin stuffed with wilted greens. A classic potato gratin has fans who are very particular about the way it is cooked in the oven. So I consulted Madeleine Kamman--who is just about the most finicky cookbook author I know, and a damned good instructor--to see what she had to say about the classic gratin method.

There's nothing particularly difficult about the method Kamman describes. In fact, it could hardly be simpler: use lots of heavy cream and let is bake a long time. As the cream browns, scrape it from around the edges of the casserole and push it from the surface under the cream underneath. Continue doing this until there is hardly any cream left, and what cream there is is studded with brown bits.

For a kohlrabi gratin:

1 clove garlic, crushed

1 tablespoon butter

1 lb kohlrabi, trimmed and peeled (I used a serrated knife to remove the peel)

coarse salt

1 1/2 cups heavy cream

2/3 cup grated cheese (combine Parmesan with Emmentaler)

Preheat oven to 325 degrees

Rub the inside of a small, shallow ceramic casserole with the garlic. Grease it with the butter. Meanwhile, slice the kohlrabi very thinly. You may want to first cut it in half from end to end. Lay the kohlrabi slices in the casserole overlapping like shingles, seasoning them with salt as you go. You may make two or three layers. Cover with the cream and shake the casserole a little to distribute the salt.

Lay the casserole on a baking sheet and place in the oven. As the cream browns, break it up and push it under the cream underneath, scraping any brown bits from the side of the casserole and incorporating those as well. Continue doing this for about 1 1/2 hours, or until the kohlrabi is perfectly tender and the cream has been almost completely absorbed. Sprinkle the cheese over the gratin and continue baking until the cheese is completely melted and lightly browned. Serve hot.

We had this last night with a wonderful salad of fresh tomatoes from the garden with fresh mozzarella cheese and basil. This is not something we would eat on a daily basis. But for now, my craving for kohlrabi is completely and utterly indulged.